Home Site Map - Steps - Preparations -
Draw Plot Map
High detail for your planning
This is mainly for you
For your own planning purposes you will want to have a detailed plot map that you can keep updated as you refine things such as paths and landscaping, as well as of course showing the position of the house. Even things such as placement of a water fountain should be on the detailed plot map.
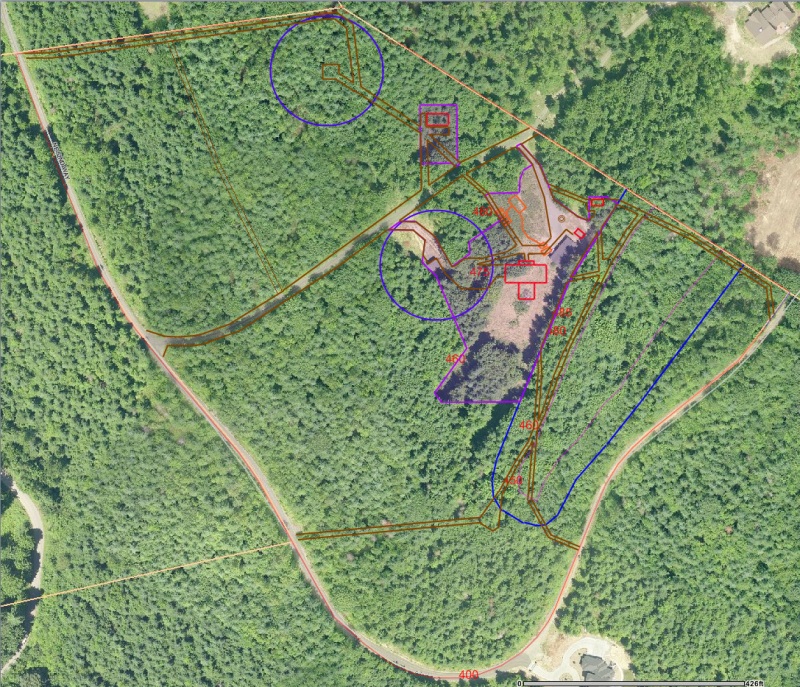
Get a satellite photo
The best info available as a starting point for your detailed plot map is a satellite photo. Depending on your area, either Google Maps or Bing Maps will have the best photos. Your local planning department may also publish satellite photos for your area. In my area, King County has a great web site with satellite photos and useful overlays such as contour lines. It's at http://www.kingcounty.gov/operations/gis/Maps/iMAP.aspx . Navigate to your plot and zoom in so the satellite photo of your plot fills your whole screen, and then do a print screen (or equivalent) to capture the image.
Layered plot map drawing
The plot map needs to have layers that can be turned on and off so you can show the info you need for different applications and yet not show too much unnecessary detail. It is best to use a powerful drawing package such as AutoCAD because this is also what you will need for the house drawings (the house drawings and the plot map will all be in one big AutoCAD drawing). If you haven't yet invested in a package such as AutoCAD you can start with a paint app that supports layers. In my opinion the best free one is Paint.Net. It can be downloaded from http://www.getpaint.net/download.html#download .
Different layers
Whether using a drawing app (such as AutoCAD) or using a paint
app (such as Paint.net), use the satellite photo of your plot as the base layer and then
add other layers on top. In my plot map I have the following
initial layers:
0) Satellite photo
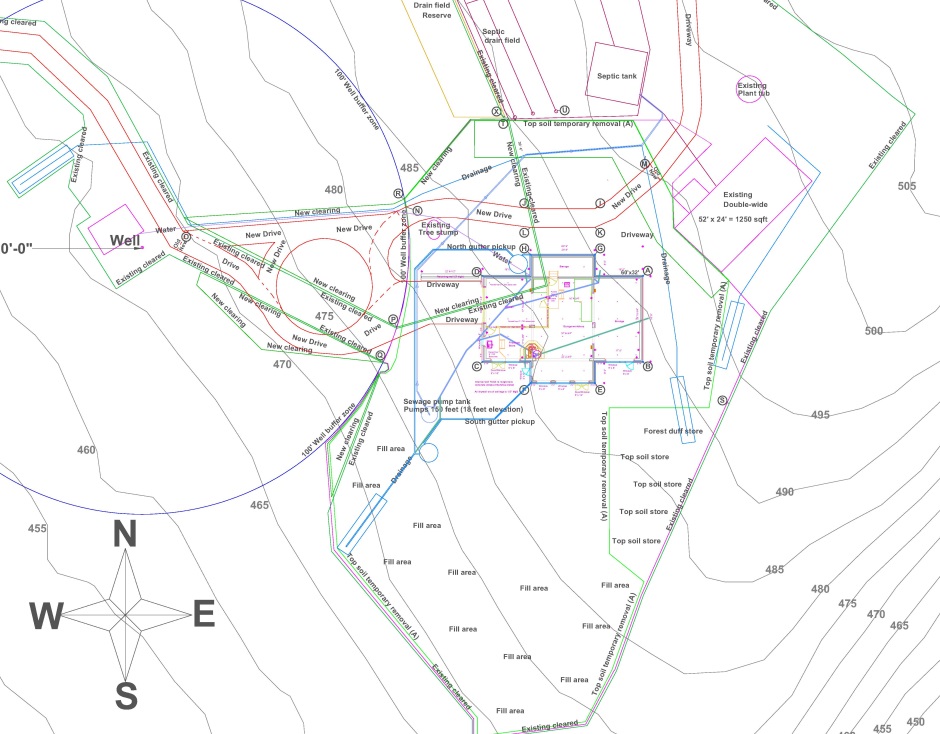
1) Cleared area for house site2) New House location outline
3) Water Well and setback
4) Septic tank and drain field
5) Paths and driveways
6) Proposed new tree planting
7) Location of steep slopes and setback
8) Elevation contours
In my case I did not have any wetland areas, but if I had then I would have also added a layer for that.
Use any old drawings
It may be that when you purchased the plot you got a drawing of an already installed septic system or a drawing of where water pipes or electricity lines had been routed. The chances are that these are rather rough freehand drawn drawings, but it is still useful info. Try as best you can to transfer these to your plot map as a drawing layer. If later you are digging around and come across a pipe in the ground then don't forget to update your plot map accordingly.
Enhance over time and keep up to date
Over time you will add more layers to support your planning application. It is certainly important to always keep your plot map up to date.
Permit submission
Stick to the official guidelines
When it comes to submitting your planning permit application you will need a plot map that conforms to the guidelines laid out by your local planning department. The guidelines specify what's needed and you should provide exactly that info - no less and no more. Including things such as the location of the water fountain in your yard will make the submitted plot map too cluttered. Obviously you will use your detailed plot map as the source of the info for compiling the official plot map. If your plot is a lot larger than the house, then planning departments like to see two plot maps - a small scale one that shows the whole plot, and a large scale one that shows the house and just the immediate area around it.
Sometimes (eg in my area) it is required that the plot map be drawn on a standard template (available from the building department).
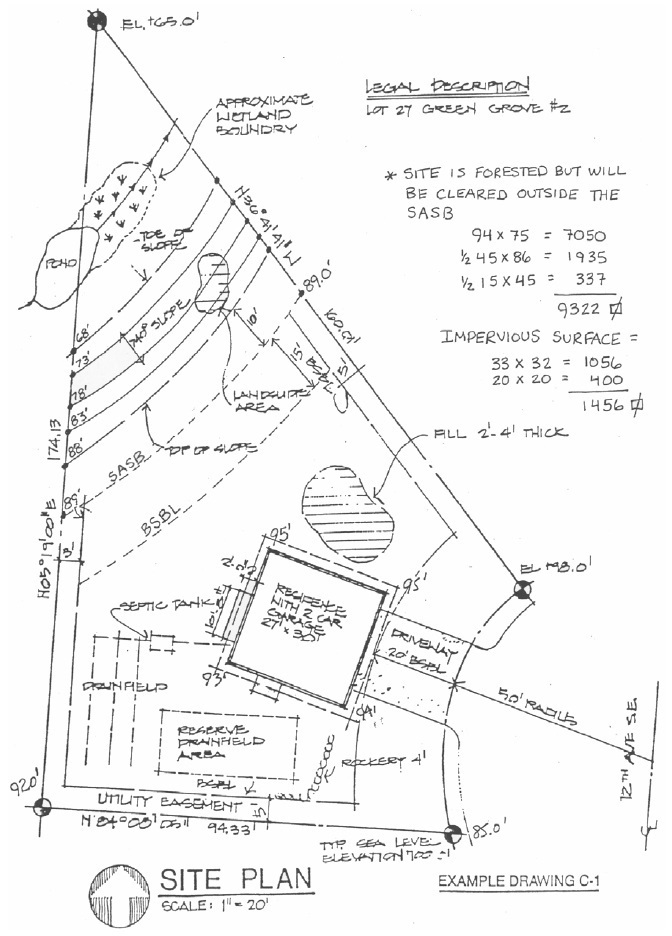
Here is the example plot map provided by my local building department (King County). It does a good job of showing the information required...
Different variants for different departments
Note that there are various different departments involved in the permit process, eg Health dept, Building dept, Drainage plan dept, Clearing and grading dept, etc. They all have different sets of info they want to see. You will make these variants by adding the superset of info to your one plot map drawing as different layers and will then turn on the appropriate set of layers for a particular print out.
What needs to be specified on the submitted site plan
Your local building department may well have a list of things that need to be shown on the plot map. Here's the list provided by my local building department (King County)...
▪ Scale - (Engineering scale is required. [The
standard is 1” = 20’; however any engineering
scale that will accurately depict the property on the required size
of paper is acceptable.])
The site plan must give dimensions for the property and show the
entire lot without broken
property lines. For large parcels, draw a two-page site plan, the
first page depicting the
entire lot at a convenient engineering scale and the second page
depicting an enlargement
of the developed area at a larger scale (for example 1” = 20’ or 1”
= 40’).
▪ North Arrow
▪ Location and Dimensions - Of all property lines
and easements, including critical area
tracts, critical area setback areas, or Native Growth Protection
Easements (NGPE) and
building setback lines [21A.12 and 21A.24 of the King County Code
(KCC)].
▪ Indicate Existing vs. New Areas - Show all
structures on the property and clearly indicate
existing and new areas. Structures include all buildings, porches,
decks, retaining walls,
rockeries, and roof overhangs. Identify existing buildings to
remain, those scheduled for
demolition, and/or those scheduled for removal.
▪ Location and Dimensions of all existing and proposed
buildings, structures, uses and
distances to property lines, other buildings and easements.
▪ Show well location and well radius.
▪ Location and Dimensions of any plat or short plat
restrictions and easements.
▪ Parking (Spacing For Two Cars) and Driveway(s) -
The driveway must be indicated and
dimensioned, from the street to the garage or parking area.
Applicants may also be required
to submit proof of legal access.
▪ Indicate Any Streets Abutting With the Property -
This includes streets, access
easements, alleys, cul-de-sacs, and joint use driveways. Provide
radius of cul-de-sacs.
▪ Show Either Corner Elevations for the Property
and the Building In Question or
Finished Topography - Topography is preferred as it provides more
information. Surface
grade elevations may be shown either from sea level or depicting one
corner of the property
at zero.
▪ If Any Portion of the Site Slopes at More Than 15 Percent,
or if an Aquatic Area exists,
show topographic contours. Maximum contour intervals equal five
feet.
Note: This elevation can generally be approximated unless a proposed
property is in a
flood hazard area or more than 500’ above sea level; if so,
applicants will have to provide
exact figures.
▪ Show Top and Toe of All Slopes inclined at 40
percent or more and more than ten feet
high.
▪ Show Any Past Excavation, Filled Areas or Cleared Areas
(Indicate depth of cut/fill.)
The clearing and grading necessary to prepare a proposed building
site is included in
the review of a residential building permit application. See
Bulletin 28, Clearing and Grading
Permits, for more information on clearing and grading requirements
and review.
Obtaining A Residential Building Permit Bulletin 9
Bulletin 9 09/22/2008 Page 5 of 14
▪ Ordinary High-Water Mark (OHWM), Slopes and
Critical Areas (wetlands, streams, rivers,
creeks, ravines, springs, lakes, ponds, bogs, areas of saturated
ground, flood hazard
areas/boundaries, erosion hazard areas, wildlife habitat
conservations areas and corridors,
and coal mines) should be indicated on the site plan. Show distances
to abutting structures.
A 100-year Floodplain Analysis may be required. Applicants must show
the elevation of
lowest floor level;
▪ If On, or Adjacent To, a Shoreline - Show the
name of the body of water and the distances
to structures.
▪ If On a Septic System - Show the location of the
septic tank and drain field. These must be
identical to the location approved by the Health Department and the
Critical Area Designation.
If the site plan does not comply with the conditions of the Critical
Area Designation, a revised
septic design or building application approval from Seattle-King
County Department of
Environmental Health is required.
▪ Indicate Location and Type of All of Impervious Surface
Areas - Please provide a
calculation for coverage of impervious surface in square feet. If
the coverage is greater than
2,000 square feet, a drainage review will be conducted by DDES.
Note: Impervious surface, generally speaking, is an artificially
covered or hardened surface
that prevents the percolation of water into the soil mantle. Roof
tops, swimming pools,
paved or graveled roads, driveways and walkways, and packed earthen
materials are all
examples of impervious surfaces.
▪ Show the outlines of the existing and proposed clearing
limits. Specify square footage
of the existing and proposed clearing.
Clearing limits and clearing covenants for “Native Vegetation Areas”
are required for many
residential permits per the Surface Water Design Manual and local
County Code (KCC).
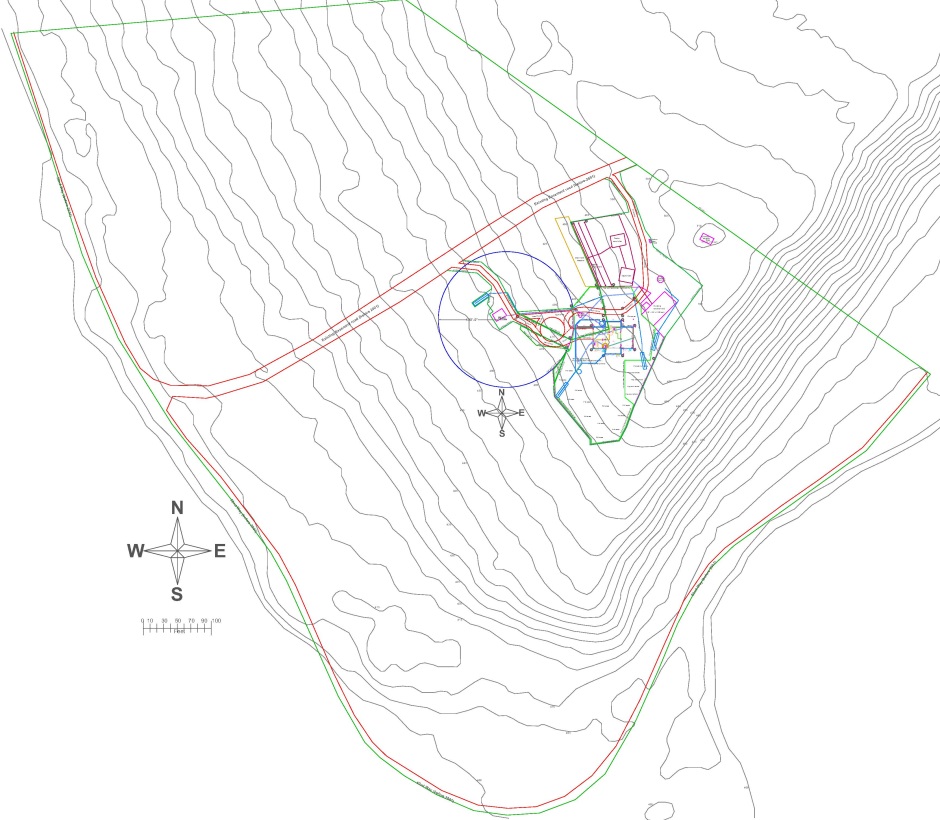
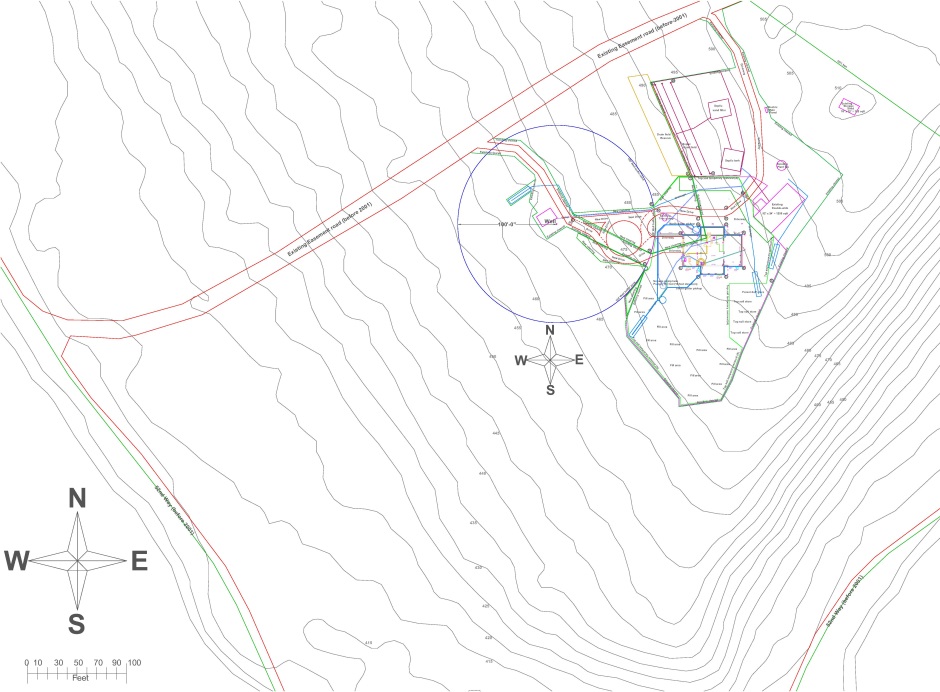
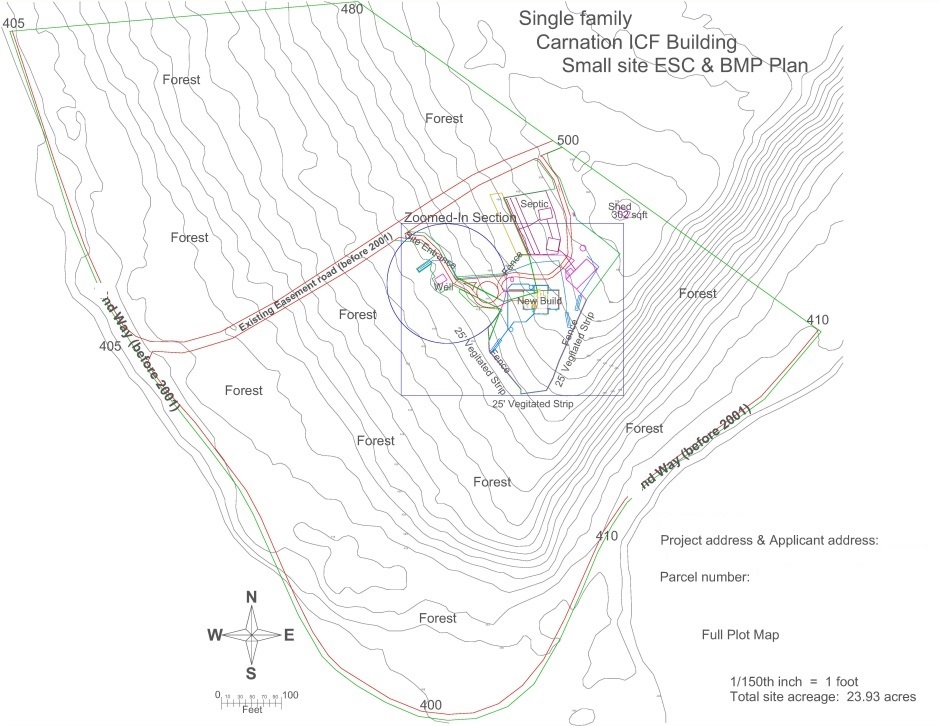
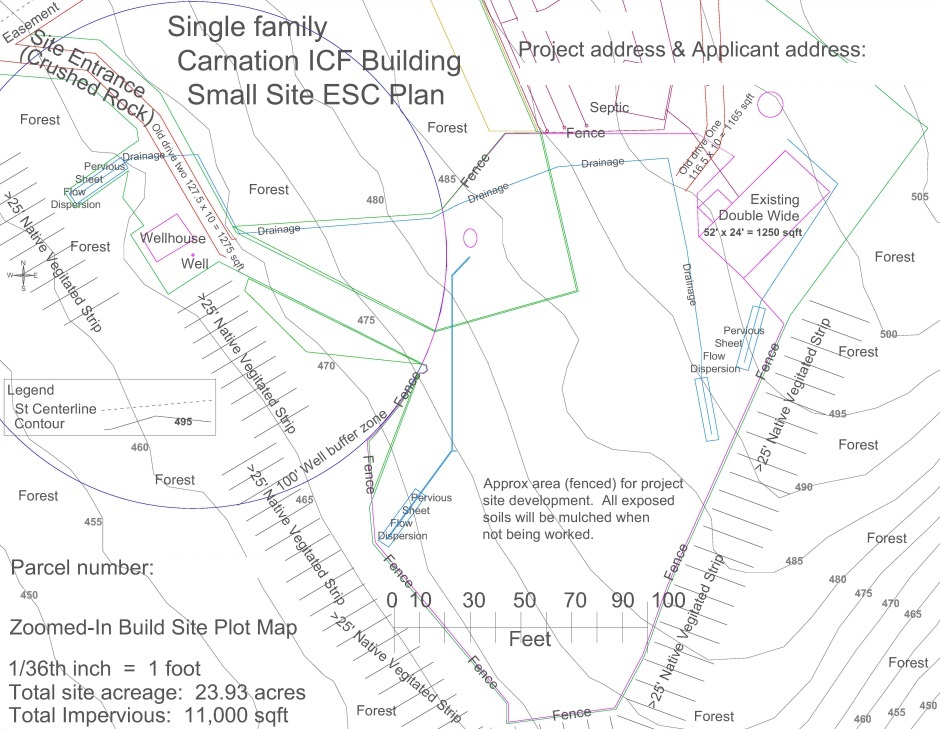
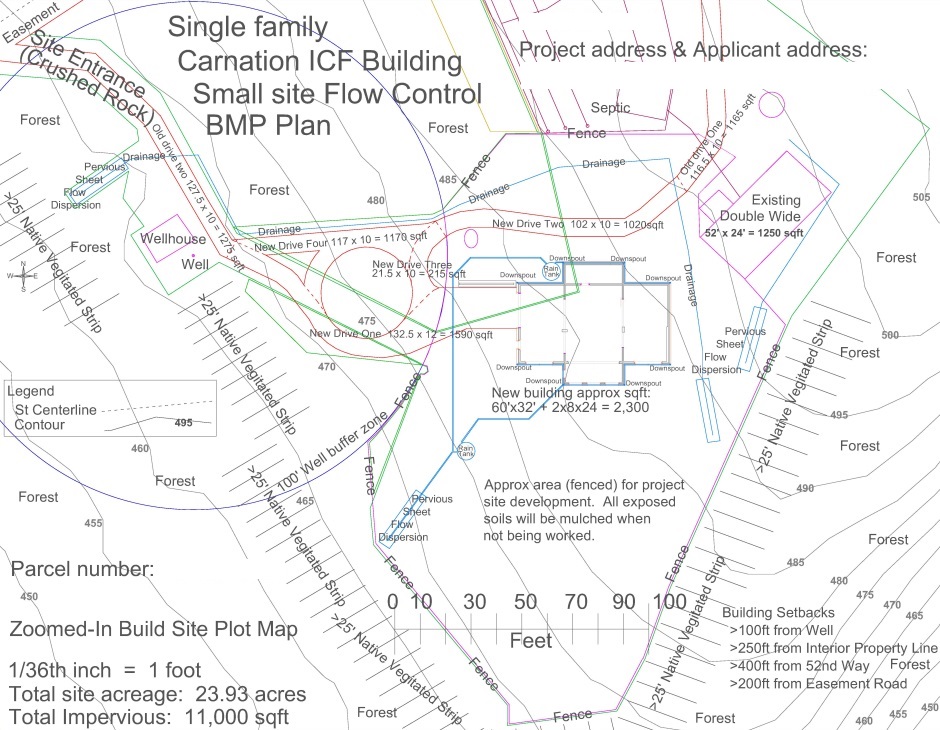
My plot maps
Here are the different variants of plot maps that I have...