


Home Site Map - Techniques - Plot Infrastructure -
Railway
![]() Implement a ride on train in your yard for hauling logs and kids .
Implement a ride on train in your yard for hauling logs and kids .
Intro
Having a ride on train in your yard might seem a bit frivolous, but actually can be quite useful. If you live in the middle of a forest and you have a wood fire heating your house, then it is a significant pain hauling logs to your house. As a secondary benefit, your kids and/or grandkids will get lots of enjoyment from it.
Traditional wisdom probably says you should chose between 5" or 7-1/4" gauge and you should then spend lots of money on track, engines, and rolling stock. Even for a small oval you won't get much change out of $20,000. I prefer a solution that provides the same functionality and enjoyment, but only costs about a tenth of the money. While you are at it you can also avoid the 1:35 gradient limitation of a traditional train setup.
Conduit rails
What is needed for the track is something that you can easily bend to make a smooth curve that can also take the weight of a train and withstand ultraviolet from the sun. PVC electrical conduit meets those requirements. Using 2" conduit is my choice. You need two lengths of conduit that are accurately held the right distance apart. Using 2x4 sleepers holds the conduit in the right place. Use 4" exterior wood screws from the top of the conduit into the wood sleepers using a jig to get the spacing right. The screws are positioned such that the heads do not interfere with the path of the wheels. It is good to add strips of 45 degree cut wood glued both sides on the top of the 2x4 sleepers to help the conduit sit better. A bed of PL-Premium glue also helps. Along the length of the track, 2x4 8 foot lumber holds the sleepers the right distance apart.
You need to be able to join the PVC conduit together without creating a bump. You can do a join by using smaller diameter piece of conduit glued inside the 2" conduit using regular PVC pipe glue. You can make smaller diameter conduit by cutting a strip out of 2" conduit down its length and then pull it in with a jubilee clip. 2" conduit is really tough stuff so will be able to take the weight of the fully loaded train. There is no need to glue track sections together because the lumber under the sleepers will hold the sections together. Not gluing makes the track sections re-usable.
Wheels
The train and rolling stock use 10" flat-free tires that run on the top of the round 2" conduit.
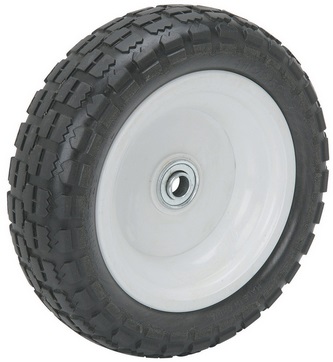
https://www.harborfreight.com/10-in-worry-free-tire-with-polyurethane-hub-62639.html $14.99
You can paint the white of the wheels gray and then paint black spokes on the wheels.
To stop the wheels falling off the top of the round conduit you could put a flange on the wheel, but my preferred way is to put a horizontal 4" roller-skate wheel on the inside on both sides. Roller-skate wheels are low cost, use high quality ball bearings, and avoid all the noise and wear of a flange rubbing on the edge of the track. A slight negative is that it is harder to make points, but I still prefer using side wheels.
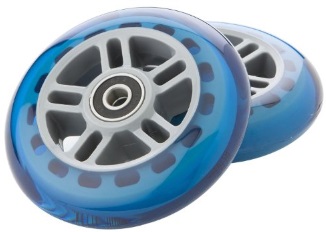
http://www.amazon.com/gp/product/B000FDFCPA?psc=1&redirect=true&ref_=oh_aui_detailpage_o00_s00 $9.99 for two
The center hole is 5/16" to allow fitting onto a 5/16" bolt. Use a 5/16" captive nut.
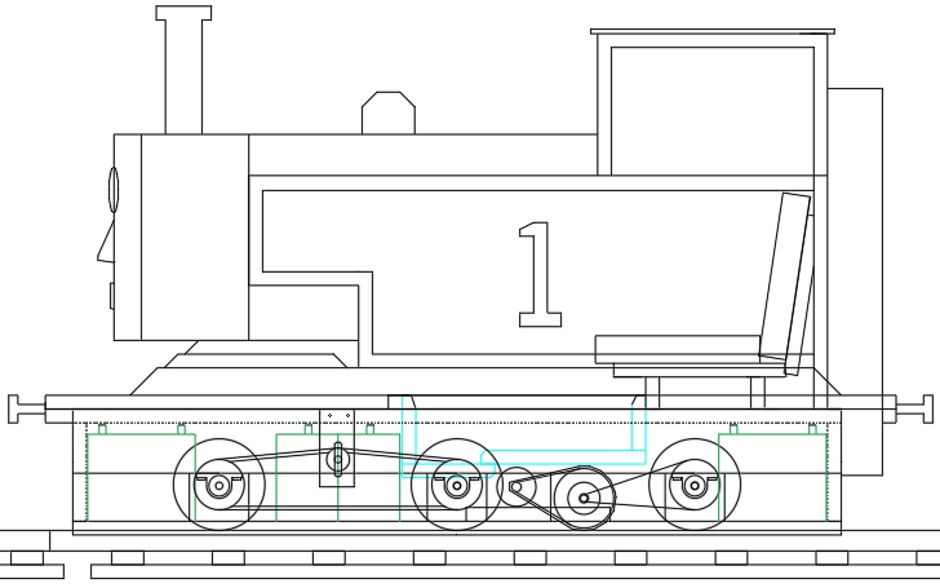
It is good to have 3 sets of 10" wheels on the engine (as it looks more like a real train engine and gives better drive grip). The middle set does not have horizontal roller-skate wheels.

Powering the train
To power the train you need a speed controllable DC electric motor that can be powered by some number of 12V deep cycle RV car batteries in parallel to get the required voltage. Use a DC motor designed for electric ATVs, go-karts, or motorbikes.
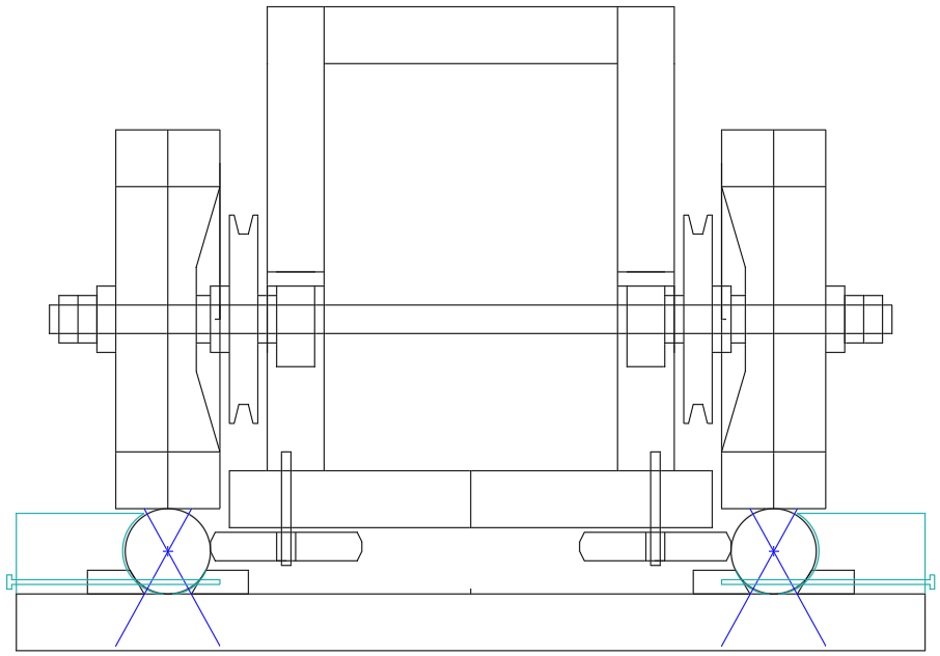
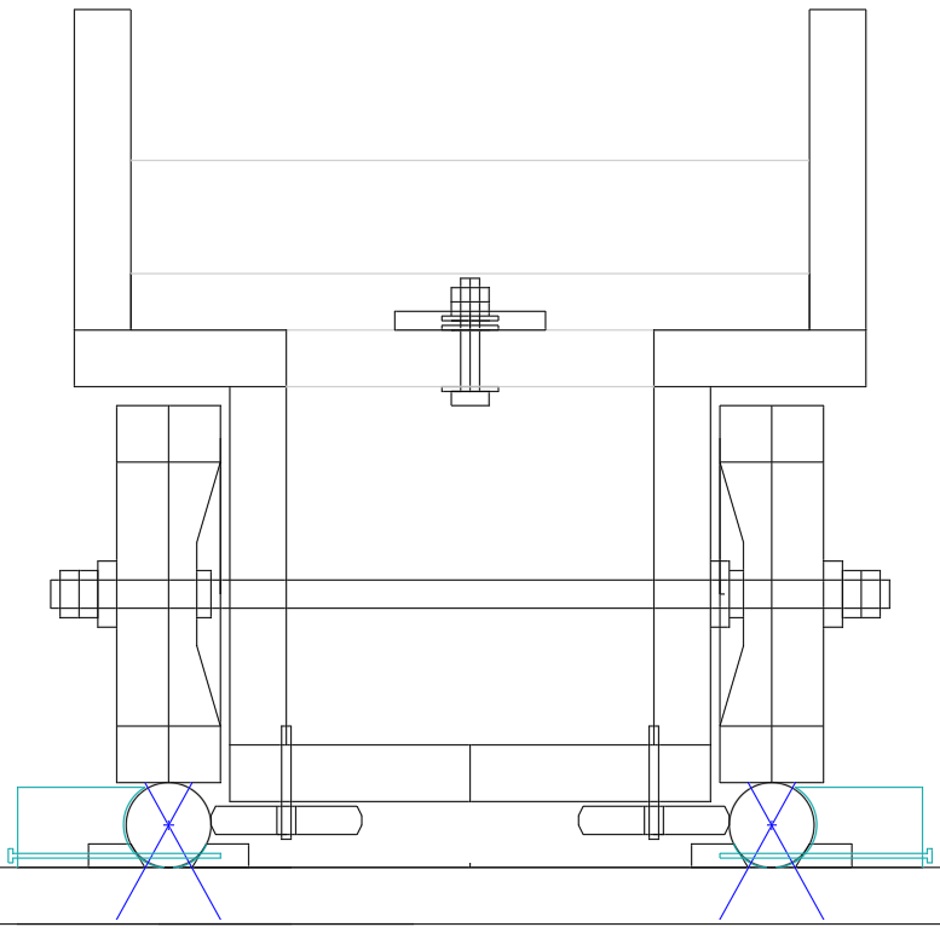
To be able to handle a steeper track gradient, it is best to make all the wheels on the train engine be drive wheels. The axles on the wheels will be 5/8" steel threaded rod. Next to each flat-free wheel will be a cast metal V-belt pulley wheel that is bolted to the flat-free wheel. Each pulley has a screw pin well into the axle to stop it rotating. The axle that receives the power from the motor will be the axle under where the person is sitting as it has the most weight on it so the most grip on the rails.
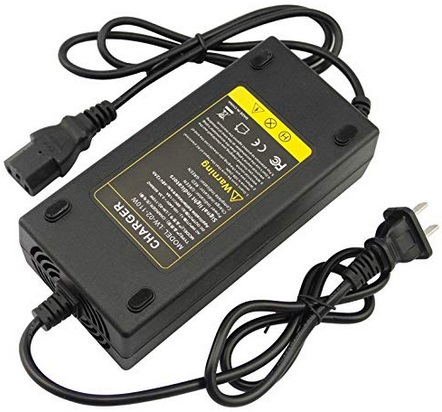
You will charge the batteries before using the train at any one of the 115V power sockets along the track. Ideally the power will have come from your offline solar panel setup (but via a 115V inverter to get the right voltage).
V-Belt pulleys
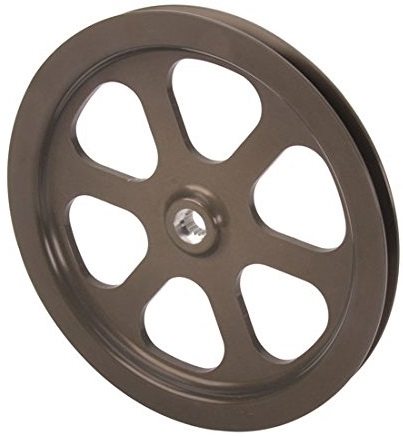
The bolting from the pulley to the wheel is necessary because the flat-free wheels come with bearings and so would otherwise just rotate on the axil rather than being turned by the axil. Both the front and rear axils are mounted in ball-bearing bearings so can freely rotate.
Using the 5.45" version is a lot less expensive at only $19 each. Using the small pulley is ok for coupling axles and may even be alright for the axle power drive.
https://smile.amazon.com/gp/product/B003N17LIM/ref=ox_sc_saved_title_1?smid=ATVPDKIKX0DER&psc=1
Axle bearings
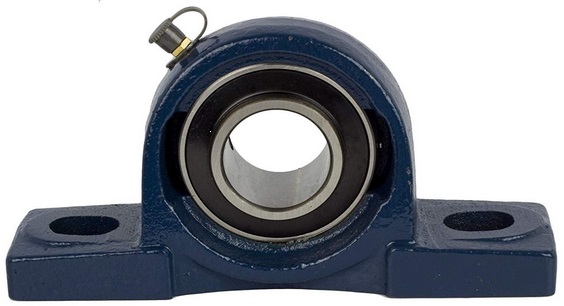
https://smile.amazon.com/gp/product/B01N0ZNXPV/ref=ox_sc_saved_title_1?smid=A1JFFMF6BJ7BL9&psc=1 10 for $61.58
1.5in wide, 2.5in tall, 4-7/8in long
Ganging axles
Because all the wheels in the engine base have a V pulley you can use a belt between the axils to drive all the axils in parallel. The motor only powers one of the axles directly. From one end of the driven axle, connect to the middle axle. From the other end of the middle axle, connect to the last axle. An extra small idler wheel is necessary to properly tension the V-belt between axles.
Temporary big wheels
The small roller-skate wheels extend down further than the bottom of the 10" wheels. This means you cannot move the train engine when not on the rails.
If you need to move an engine (or truck) around when it's off the rails you can temporarily fit 16" wheels to the 5/8" axles. This gives about 1.5" ground clearance to the horizontal roller-skate wheels.
Motor bundle
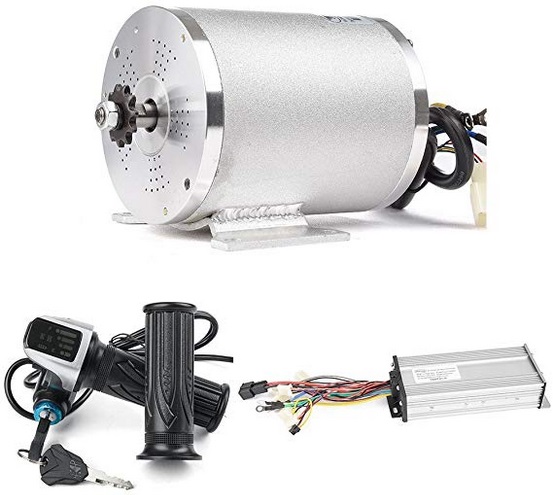
It is best to get a brushless motor (because changing brushes is a pain, as is buying them).
It is easiest to buy a complete package as used for electric Go-karts (and ATVs and motorbikes). You can get up to 2500W using 60V or even 3000W using 72V, but a less extreme choice (and what I use) is 2000W using 48V.
https://www.vevor.com/brushless-dc-motor-c_11227
Electric Brushless DC Motor Complete Kit, 48V 2000W 4300RPM High Speed Motor, With 33A 15 Mosfet Controller, Battery Display LCD Throttle
https://www.amazon.com/gp/product/B07G2LZHD8/ref=ask_ql_qh_dp_hza $179.99
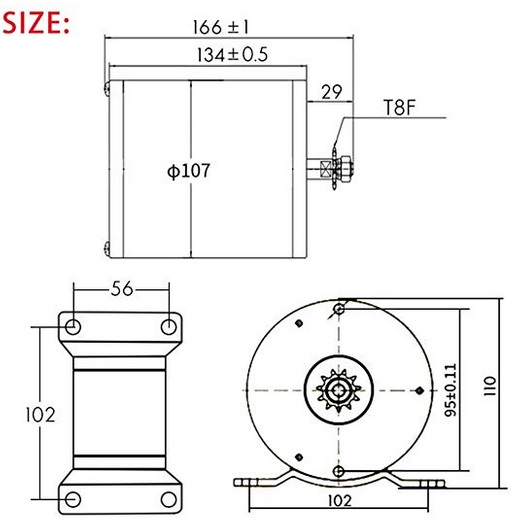
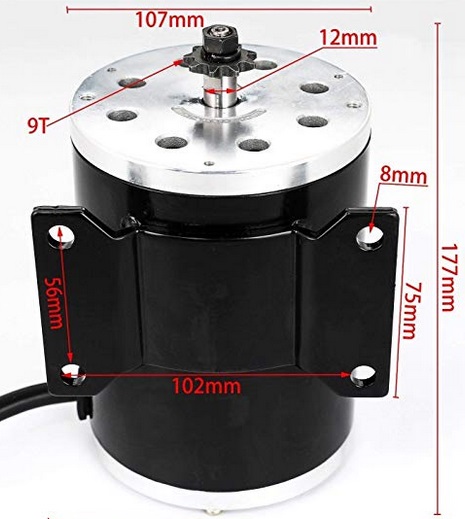
*** Motor ***
Brushless High Speed DC Motor
Rated
Voltage: 48V DC
Rated Power: 2000W
Rated Current: 42A
Rated Speed: 4300r/min
Sprocket: T8F 11T Chainwheel
High Quality Aluminum Motor And High Quality Rotor Magnet All
Copper.
5400 rpm when set to high, 4300 when set to low.
Max torque is 6.9N.m
*** Controller ***
Power: 48V 2000W 33A
15 Mosfet Brushless Controller.
Functions: Reverse,
Speed Control, Three Speed (High Mid Low Speed) Indicator Light,
Electric Brake, Hall Sensor, Power Lock , Battery Charger, Brake
Light.
*** LCD Throttle ***
Rated Voltage: 48V
Battery
Power Display
Power Lock Key
Ignition lock
Input
Voltage: 1.1-4.7V
Speed controllers use Pulse Width Modulation. It is best to buy the speed controller as part of a bundle with the motor as this ensures compatibility and can also be less expensive. (If there are multiple motorized units forming a train then you need some way to gang together the speed control for each unit.)
If you just want a motor (without a speed controller or throttle assembly)...
https://www.amazon.com/1800W-Brushless-Electric-GoKart-BM1109/dp/B07GS2GMPW/ref=sr_1_3? $89.99
Even if you choose the full kit with its smaller size motor you should allow room for this slightly larger motor.
The bundles come with a handlebar throttle. This is a good solution for controlling the train in the cab.
Speed and gearing
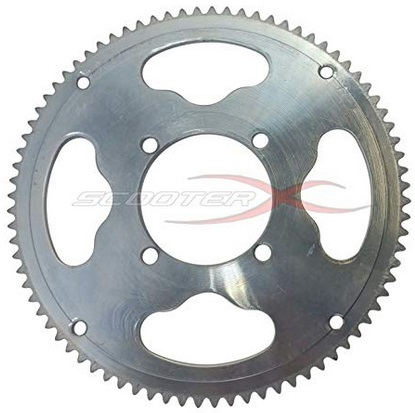
The motor comes with a small chain cog (either 11 or 9 tooth). To gear down the speed (and increase the torque) you want to connect that with a chain to as big a cog wheel as possible. This one is 80 tooth with a 6.5" diameter.
 https://www.amazon.com/gp/product/B0085MCPSK/ref=ox_sc_saved_title_1?smid=A1EPE8GMWC6QK5&psc=1
$12
https://www.amazon.com/gp/product/B0085MCPSK/ref=ox_sc_saved_title_1?smid=A1EPE8GMWC6QK5&psc=1
$12
Center hubs are expensive and are not easy to buy with a 5/8" shaft size. A better bet is to bolt the large cog to an extra 5.45" V-pulley.
Here is the calculation to determining the speed that the train will go if the chain from the motor goes directly to a larger chain cog on the wheel axle...
Speed (mph) = Motor rpm * (3.142 * (Wheel diameter (in) / 12)) * 60 / 5280 * Motor pulley number of cog teeth / Axle pulley number of cog teeth.
4300 * 2.618 * 60 / 5280 * 11 / 80 = 17.6 mph
You don't want more than 10 mph, so you need a short intermediate axle to further gear it down. On a short 5/8" axle with two extra bearings, put a large cog (mounted on a V-pulley) and a smaller V-pulley to drive a wheel axle. To give more speed flexibility it's good to use a small pulley with a range of diameters.
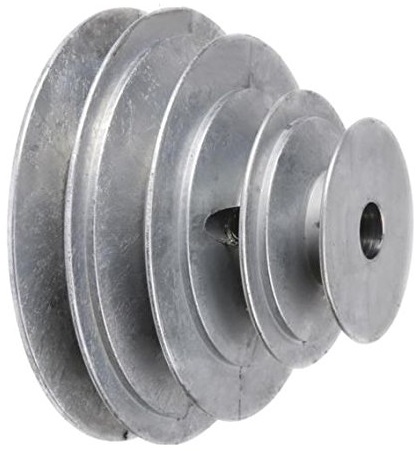
https://smile.amazon.com/gp/product/B00004RAO1/ref=ox_sc_act_title_1?smid=A2NQ1HXRR3R8EI&psc=1 $23
1-1/32", 1-19/32", 2-11/32", 2-28/32"
Making sure that the belt does not slip and that pulleys don't turn on the axles is a potential issue. It might be necessary to use a larger diameter V-pulley on the driven axle. Also drilling pits (or filing flats) in the axle where the screw makes a mark will help. Another solution is to include two sets of pulleys to drive the axle from the short intermediate gearing axle.
V Belts
For connecting the axles use an "A" type belt, ie 1/2" wide at the top and 5/16" deep. Search Amazon for "V belt A type uxcell" or eg "uxcell A51 Type" for a 51" belt.
Readily available belt lengths (in inches) seem to be... 24, 25, 30, 32, 33, 34, 36, 37, 38, 39, 42, 45, 51, 52, 54, 55, 56, 58, 60, 64, 67, 69, 70, 71, 78, 81, 82, 83, 84, 85
For the tensioning mechanism for the belts between the axles you need a tensioning extra wheel.
Batteries
Use four 12V deep cycle RV batteries in series to get 48V. You want the batteries in the train engine so that their weight (in addition to the weight of the person) helps the wheels grip the track.
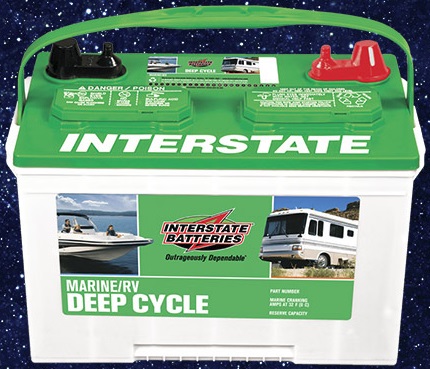 Length: 12-3/4", Width: 6-3/4", Height: 9-1/2"
Costco deep cycle grp 27 12v battery Interstate 27DC Interstate model
SRM-27 Costco Item# 850982.
95 amp-hours.
http://www.interstatebatteries.com/m/category/rv/rv-deep-cycle $80 + tax
Brakes
Don't forget about implementing brakes!
Potentially you can reverse the motor using the reverse switch but this might be extreme. Need to do some experimentation to find a good solution.
If you short out a DC motor it will become very hard to turn.
Trucks and carriages
These just have two sets of wheels. If the track is only a moderate gradient then the rolling stock can be unpowered and the wheels can rotate freely. This is the normal case.
The 5/8" threaded rod is mounted without the ability to rotate because it relies on the bearings in the wheels to provide free rotation.
The typical length for a truck is 8 foot. For hauling long logs it is good to use two 4' trucks, one at each end of the log.

The coupling between trucks is done with a 1" wide flat 1/8" metal strip that sits on 1/2" bolts. The strip is installed to the top of the bolts and the nuts are fitted from above. This is to make it very unlikely that the trucks will accidentally become uncoupled. The metal strip comes through a slot hole in the rear wood of the truck.
If a truck comes uncoupled from an engine, brakes need to come on automatically. Perhaps under normal circumstances each truck gets a 48V feed that keeps a sleeper drag arm in the up position. A 48V solenoid can act as a catch to stop the drag arm from dropping. The drag arm needs to be manually pulled up on each truck when it is coupled up as part of the train.

https://www.amazon.com/gp/product/B00PZNY9WM/ref=ox_sc_act_title_1?smid=A1THAZDOWP300U&psc=1 $10.11
Track
Given that you are implementing your own track and your own engines and rolling stock, you can make the track gauge whatever you want. My choice is 16" on center. This approximately equates to somewhere between 1/4 scale and 1/3 scale (not that it really matters much).
Forming straights

Straights are manufactured in 8' 2-1/2" lengths.
Using cedar is preferable but if using regular softwood then you will need to paint it with wood preservative.
Start with two 8 foot lengths of 2x4 laid along the track length. Mark the 16" on center points where the 2' sleepers will be fixed. Cut the 2' sleepers and screw the sleepers to the 'along the track' 8 foot 2x4s.
Glue on the 45 degree cut wood either side of where the conduit will be. Use a jig stick to get them in the right place.
Use the jig stick with square cut-ins to hold the track the right distance apart and the sleepers in the right place. Provide a bed of PL-Premium adhesive for the conduit. Screw the conduit from the top into the sleepers.
If needed you can also make shorter straight lengths to fit the needs of your layout.
Forming corners

Corners are manufactured in just over 9' lengths. The radius to the center of the track is 35 feet. Each curve section does exactly 15 degrees.
Twin 2x4s give a base for the curve. Additional pieces make the joins.
Forming points
Electrical conduit can happily bend and flex so it is easy to move it between two positions.
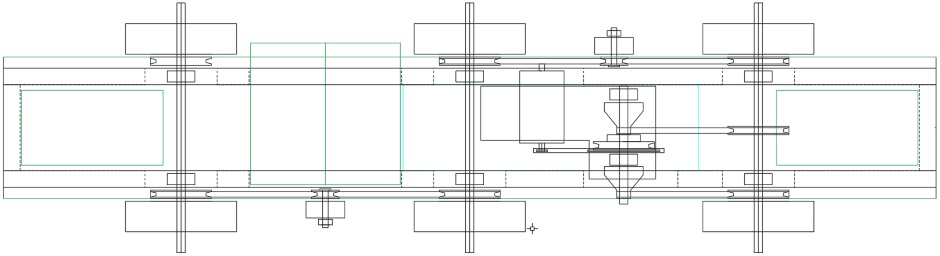
Because of the horizontal guide wheels you cannot use points with a frog. Instead you need to individually move the rails to a new position. It is even necessary to lift the end of the flexible track over the track it connects to due to the different rail lengths associated with the track bending. Changing points is a manual task that is not suited to automation. I decided to make all points be Y points. The Y points can only be fitted on a curved part of the track. They stick to the standard of providing a 15 degree track turn (at a 35' radius). In the diagram below, the top of the Y drawing is the main line and the bottom of the drawing is the branch line.
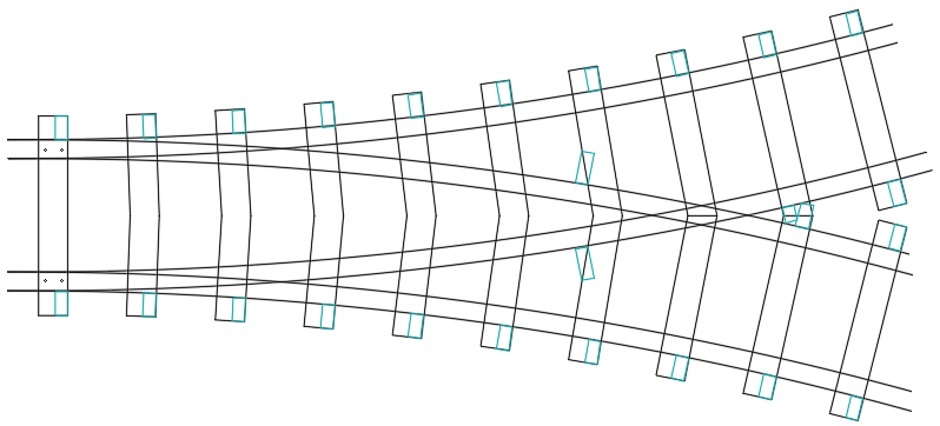
Because the conduit needs to move in the case of points, it is not possible to screw it down. Instead, on the outside, bigger wood stops are used to cradle the conduit in the right position. In the above diagram the positions of the wood stops are shown in blue. In all the other positions just the regular low height angle blocks are used.
On the rails on the outside of the Y you need to in strategic places fit a 1/4" pin through the wood stop and through the bottom of the conduit to hold the conduit in place. Drill on a drill press the hole though the wood stop and then finish off the hole once the wood stop has been glued to the sleeper and the conduit has been fitted.
The track that forms the spur from the main line needs to have adjusted track lengths in order to mate up with the rails after they have been bent outwards. The end even needs to be cut and an appropriate angle. Use a small protrusion of inner 1.5" conduit from the ends of the 2" conduit rails that move. Potentially cut the 1.5" conduit along the length and wedge it open a bit while gluing to increase its diameter slightly to make a tighter fit. Make them as long as possible consistent with being able to get them into the ends of the track after the points.
The complicated arrangement of sleepers are held in all the right places by screwing to the longitudinal lumber underneath.
Forming the roadway
You need a nice even gradient and you want the gradient to be as shallow as possible. Over ravines and ditches you need a bridge. If there is a hillock in the way then do a cutting. Sometimes there is no solution other than having a gradient.
You need support under where the 'along the track' 2x4s are.
If the surface is earth then it needs to be well compacted so you don't get subsidence.
Laying the track
You need crushed rock under the sleepers to make a stable surface and to allow water to drain away from the sleepers so they don't rot. The crushed rock hides the 'along the track' joining lumber. Crushed rock also makes it look like a real railway.
Use a 2" thick layer of crushed rock (with fines). Having the fines makes it less expensive because it avoids a filtering step and it also helps it lock together to make a more stable base.
Engine bodywork
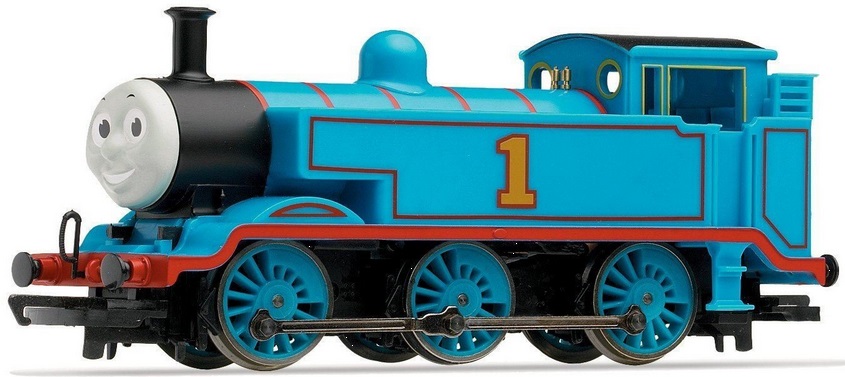
The motorized base is a 7 foot long low slung box. There is complete freedom as to what cosmetic bodywork you want to build on top. If you ask kids what an engine should look like they will probably say Thomas the Tank Engine (or possibly Percy). It is fairly easy to build a Thomas body using plywood with a 2x4 framework inside.
You need to construct the bodywork such that an adult can get inside to drive the train. This does make the engine body taller than is ideal, but it is a price worth paying. Note that it is a ride-in train rather than just a ride-on train and the body provides weather protection so you can happily use the train in the rain. Make the cab side hinge-able to allow the adult to get inside.
Make the body work easy to bolt on or off the motorized base.
Could even add a smoke machine to the funnel.