Home Site Map - Techniques - Structure -
Carnation Walling - Wall Rebar
![]() Fit the horizontal and vertical rebar to the walls in all the right
locations as per structural engineering.
Fit the horizontal and vertical rebar to the walls in all the right
locations as per structural engineering.
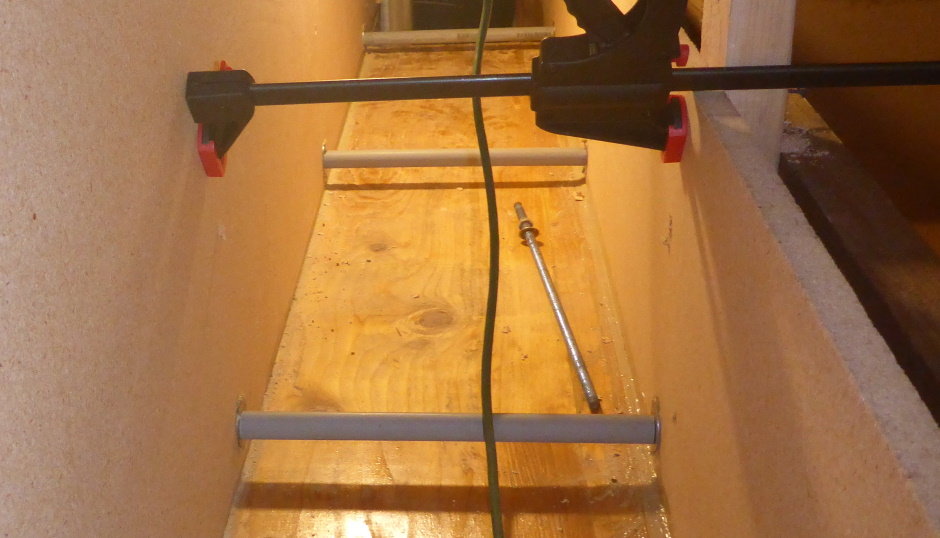
Fitting rebar supporting wall tie pipes
Wall tie rods already present at wall bottom
There should already be 3/8" threaded rod wall ties at the very bottom of the wall (4" position). There will also be a few further up the wall but this is only to hold the wall structure together. It is best to remove most of the ties further up the wall so they don't get in the way, but leave a few at the top of the wall. All the vertical batons are fitted, both inside and out.
Rebar placement CAD drawings
Rebar placement should be specified on your CAD drawings and should have been added to your drawings to meet the requirements of the structural engineering process.
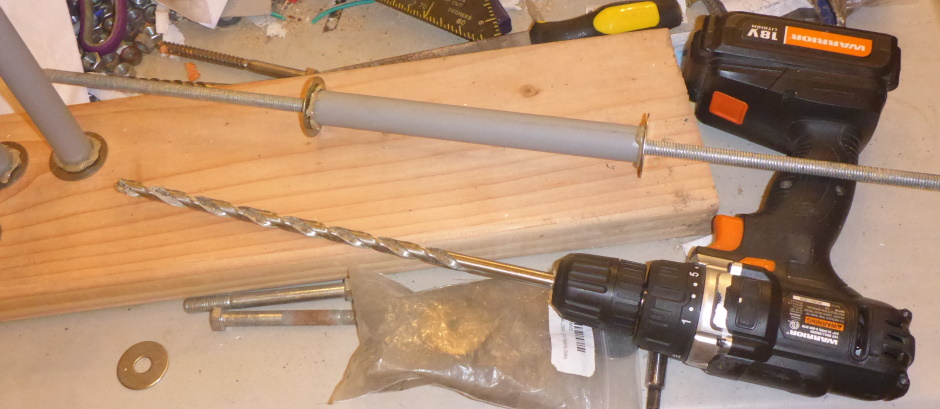
Make rebar supporting plastic pipes
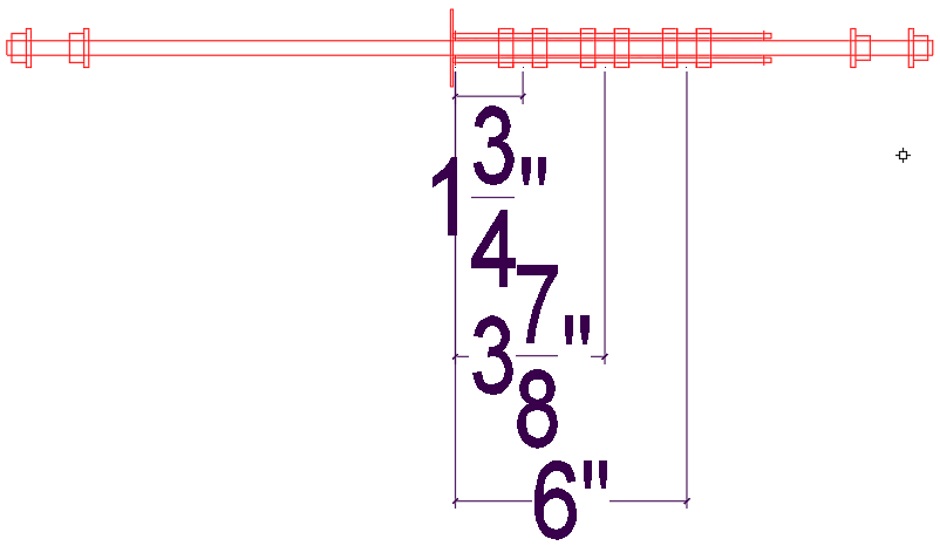
Rebar positioning within the concrete cavity width is important.
Relative to 8" thick concrete, the
calculated center of the
horizontal rebar would
be at 1-3/4", 4", and/or 6-1/4". In practice I
decided to adjust these figures to give more tolerance clearance on
the inside so the actual positions I use are...
1-3/4", 3-7/8", and 6".
1-3/4", 6-1/8", 8-1/4", and 10".

Note that the locations given are for the horizontal rebar. The vertical rebar positions are typically offset by half an inch relative to these locations.

Add rebar to cavity
When lengthening rebar using a splice it is required to use an overlap of 30 diameter, ie 15" for half inch rebar. In practice I use a minimum of 24" (2 foot) overlap and in practice much more.
We are putting the rebar into the cavity in its right sequence relative to each other in the cavity.
At the edges of openings there will be more vertical rebar and it will be constrained by rebar stirrups. The stirrups need to be added as you add the vertical rebar.
There will also be extra vertical rebar at corners.
You need to make sure everything is as per the structural engineering rebar placement requirements. Don't forget the 45 degree corner pieces used at the top of wall openings.
At the corners it is best where possible to use horizontal rebar with 90 degree bent ends to bend into to the adjacent wall where it can be tied to the horizontal rebar of that wall.
Throughout the building of the walls, look for opportunities to add more rebar anywhere you think it will help. Remember that the rebar placement spec in the structural engineering drawings is just the minimum required.
Do the following steps for the internal walls too.
Horizontal at wall bottom
It is ok to add horizontal rebar at the bottom of the wall because there are no stirrups on the verticals at the bottom 1'10-1/2" of the wall. At the bottom of the wall use two pieces of horizontal rebar. The extra rebar that is specified by the structural engineering to be every 5 feet, but I actually do every 2 feet.
Only add horizontal rebar up to the bottom of the wall openings or else it will get in the way of adding the stirrups on the vertical rebar at the sides of the opening.
Verticals with stirrups at openings
Where a two stirrup assembly is called for, tie them together first with a couple of cable ties.
The stirrups are added as you add the vertical rebar. You will need to tie the stirrups in the right locations to stop them dropping down.
Add horizontal rebar
Horizontal wall rebar can be added just after fitting a stirrup at the corresponding level.
In the case of a backfilled wall the vertical rebar will be close to the inside of the building, but then the horizontal rebar will be in the 6" position (from the outside of the concrete) closest to the inside of the wall so the vertical rebar (at 5-1/2" from the outside of the concrete) will still be nearer the wall outside than the horizontal rebar. Even with a backfilled 8" wall there will however still be some occasional horizontal rebar in the center position and this is closer to the outside than the vertical rebar, so this needs to be added first.
Note that the vertical rebar positions do not correspond with the positions of the wall tie rods. These are typically at the positions where the vertical rebar comes up through the slab.
Tie the horizontal rebar (that is further out than the vertical rebar) using strong cable ties to the conduit in the correct places.
Stirrups above wall openings
All the horizontal rebar above wall openings gets constrained by these "cow-head" long stirrups.
Outer occasional horizontal above openings
This is done now because it is nearer the outside than some of the verticals that are above a stirrup area. The horizontals are within the cow-head long stirrups.
Add vertical rebar
For external walls (both 8" and 12" cavity) the primary vertical rebar always has its center 5-1/2" from the outside edge of the wall concrete (ie 5-1/2" from the EPS). The calculated position is actually 5-3/4", but I have chosen to offset it a bit to provide more concrete covering for the rebar on the inside. The vertical rebar position corresponds to being just inside (nearer the center of the wall) compared with horizontal 1/2" rebar that is in the inner position on the 8" cavity plastic wall tie tube.
The half inch rebar used for the verticals has a bend in the end. The bend goes at the top and some length is cut off the straight end to make it fit. The bend leg at the top needs to be held the correct distance from the top of the flooring EPS. The chair height is 1.5" so for the moment you can use lengths of 2-by (cut in half long-ways to a 1.5" width). Twin screws can be used to hold the tails in the right locations.
These diagrams show the calculated positions for the vertical rebar (not the actual adjusted offset positions).


Secondary vertical rebar when required is at the following locations
(also listed is the primary calculated location of 5-3/4")...
2-1/4" (4-1/2")
5-3/4" (8")
9-3/4"
For internal concrete walls the vertical rebar is near the center within the 8" cavity, but a half inch towards the building center tied to the horizontal rebar at the 3-7/8" position. The vertical rebar is at the 4-1/2" position relative to the outside edge of the concrete of the internal wall.
The vertical rebar is not even close to a tie rod.
The vertical rebar per the drawings should extend 3' 5" beyond the top of the slab of the floor above. In practice the vertical rebar that goes above slab height is added later so it does not get in the way of the polyethylene sheet that forms a temporary rain-proof roof.
The vertical rebar that comes up above the concrete floor above needs to be fitted through holes made in the 6mil polyethylene sheet that covers the floor above. if you are using extension pieces of rebar to provide this then you can delay fitting the extensions. You want to for the moment keep the sheet over the wall cavity as it stops rain, leaves and pine needles getting into the wall cavity.
Tie the vertical rebar
Tie the vertical rebar to the horizontal rebar.
The tying of the vertical rebar to the horizontal rebar that in turn is tied to the wall ties keeps the wall ties in the right locations.
In the case of the vertical rebar it is typically rubbing next to a piece of horizontal rebar and the two are tied together (the tie point is not at the plastic tube). You are relying on the friction between the horizontal rebar and the vertical rebar to hold the wall tie tube in the right vertical dimension. Having them held in the right locations will be important later when it comes to fitting the plywood sheets. Use a temporary length of 2x4 with holes to hold the tie rods in the right position when tying the horizontals to the verticals.
Tie vertical rebar to foundation rebar
Also tie the vertical rebar to the 3' 5" vertical foundation rebar.
For a backfilled wall with vertical rebar every 6" then only every other vertical wall rebar is tied to foundation rebar. Note that this is much better than with traditional ICF where it is not practical to tie to the foundation rebar. Tying to the foundation rebar also very important to stop the forming rising up with the wet concrete pressure. Tie very securely and in many places along the 3' 5" length.
The story so far
All the rebar (both horizontal and vertical) has been added to the cavity in the right sequence relative to each other. It is all tied in the correct positions on the few wall ties that are currently present. There is no internal plywood on external walls so it is still possible to get your hands into the cavity. Internal concrete walls have plywood on the outside face (but not the inside face) and the internal wall rebar has also been added.
Add tie rods to the corner verticals
This involves drilling holes in the EPS because it is actually a secondary location. Add the washer and conduit on each piece of threaded rod.
On the inside corners of walls there is a 2x6+2x4 vertical corner assembly that is already in its final position. The tie rods for this use a secondary position so holes in the EPS need to be drilled. Put a vertical 2x4 baton on the outside of the 8" EPS wall and hold it in position using 3 outside horizontals attached to the existing 2x4 outside vertical baton that is in the first primary position. Use the holes in the vertical 2x4 baton as a guide to drill holes through the EPS at the X'9" positions and also at the 4" from bottom position.
Once you have the holes, fit threaded rod, washers, and conduit through to the insider 2x6 corner assembly.
Fit all the other wall ties
In all the locations where there will be a vertical baton, add the treaded rods with the washer and conduit. Add a vertical baton on the wall outside. It is good to temporarily add an internal vertical baton the tie rod in the exact right location. Tie the tie rods to the horizontal rebar.
Fit the vertical 2x4 batons in final position
As you gradually add horizontal rebar it becomes more necessary to support the threaded rod to stop it bending down. Full height vertical 2x4 batons do this nicely but can get in the way of adding the horizontal rebar. If there is a danger of the threaded rods bending down, you need to keep adding and removing the vertical 2x4 batons as you add horizontal rebar. Sometimes you are able to thread the rebar in from the end and thus avoid temporarily removing a baton.
Eventually you will need to add the vertical 2x4 batons in their final positions along the wall. They sit against the nailed down kicker boards and on appropriate thickness wood shims. Also horizontal bracing is added to hold them the right distance apart. The net result is that all the threaded wall tie rods are held accurately in their right locations.
Photos of the actual implementation are here .
Inspection