


Home Site Map - Steps - Basement Walls and Ceiling -
Access Holes
![]() It is really hard to make holes for services after the concrete has
been poured and has set, so it is best to plan these holes early.
It is really hard to make holes for services after the concrete has
been poured and has set, so it is best to plan these holes early.
Mark main level walls
Knowing where the rooms on the floor above are helps ensure all the right holes in the basement ceiling. Mark all the main level plumbing features (including floor drains).
You need to also 'live the basement' to make sure no holes are forgotten.
Required holes
Here are some ideas for the holes you will need through the concrete walls and the concrete ceiling/floor above. It is very hard to make holes through concrete walls after the concrete pour, so it is important to fully plan ahead. In addition to the holes listed below you should add lots and lots of spare holes. If in doubt, add a hole, or preferably two. The list below is a bit random and could do with a cleanup, but that all helps stimulate the deep thought process.
Use 4" PVC pipe collars and then the actual pipes or electricals can be fitted later. Where there is 4" piping required then you need enough spare pipe on both sides of the concrete so a glued connection can be made. Even when just a hole, extend 4" PVC pipe beyond the concrete so a cap can be temporarily put over it to seal it from rain.
Main electric conduit from plot junction to come through back wall
The electric feed will come through the back wall of the basement. Needs thick cable in four 2" schedule 40 conduits from the main junction panel that's to the north of the driveway.
Main water pipe from Well to come through back wall
Will come through the back wall of the basement. The pipe must be well insulated with EPS or soil so that cold air does not freeze it.
Implement toilet and sink drain pipes for Main Level above
These drain pipes need to be in the floor above, ie in the ceiling
of this level. This is because most things are either in an island (eg
kitchen second sink) or are separated from the DWV stack by a
doorway. Typically each wet area will need a toilet ring in the
floor plus one for the bidet plus a bath waste pipe in the floor
plus a general one for the sink and anything else.
Provide floor drain in bathroom and utility areas (Basement ceiling)
Drains in bathroom floors are a good idea and would be hard to
retrofit later through the concrete.
If nothing else they guard against someone accidentally letting the
bath overflow.
During house construction they may also have a role in draining
water off the flat roof.
Put a drain under the Main Level bathroom and one under the utility
room. Also put one under the island in the kitchen.
Plumbing and electrical holes through concrete walls and floors
Don't forget there are 2 internal concrete walls that also need holes.
Make sure you have holes for all the plumbing and electricals that
are on the house blueprints.
More holes and add plenty of spare holes to be safe.
Need a few electrical sockets on the outside wall for garden power.
Need water taps for the garden on outside walls. Need ample external
garden taps. To some extent these can be brought through the
wall using the tie rod holes.
Need holes for broadband, gas, satellite coax etc.
Need ERV holes (ERV also needs to provide intake air to wood fire)
(ERV ducting will be 4"). Stale and fresh air intakes are 6".
Need tumble dryer vents (unless using a condensing dryer).
Need extractor fan vents for bathrooms and kitchen. All bathrooms
need extractor fans. Ideally even the ones that have windows
(although code does not require it).
Hot (and cold) water needs to go to the garden for a garden shower
and for the swimming pool.
Need a pipe to and from the rain water storage tank (which
is
buried outside).
Need fire sprinkler pipes.
Need trash shoots from Kitchen to basement.
Need fire ash shoot to basement from living room fire.
Need wall and floor holes as per drawings. This includes wall
alcoves eg up the stairway and for appliance garages.
Special provision is needed for the two bathrooms on the basement
level (including the apartment bathroom). The toilets need to be
mounted to the concrete wall using 5/8" threaded studs. The baths are easier but even so need
some planning.
Mounting brackets above baths for person lifting hoists if ever needed.
Mounting brackets for stairway inner rail.
Need a separate waste pipe to the outside under deck from the kitchen garbage disposal unit. Waste pipe from garbage disposal will be separately routed out of the house so that it can either be routed to a compositor.
Separate drain pipe for the mudroom sink (to avoid putting mud into
your septic system).
Need access holes through the floors. Lots are required. They get
services from the basement to the upper floors. Used for lots of things
such as sewer pipe, hot and cold water, radiant heating for upper
floors, electricals, etc, etc.
Make sure right floor holes done to get all pipes and wires through
PEX pipes, DWV, ERV (ERV ducting will be 4"), radiant heating PEX,
central vac, etc.
To do this it will be necessary to mark out where the various rooms
on the Main Level will be so that holes in the floor are provided to
get eg the PEX through under the fixture.
Sink drain pipes can be routed later, but if floor mounted toilets
are used then their waste pipes need to come up through the concrete
floor.
For central vac, need holes in the concrete floor. The holes in the
floor also serve as drainage if the fire sprinkler system goes off.
Put 4" holes under the wainscoting every 6 feet.
Floor plan drawings need to show floor holes.
Hole for a possible safe in internal concrete wall
Even if you are not thinking of having a safe (I'm not) it is still worth providing a hole for it. Internal concrete walls are the best place.
Make sure right wall holes done to get all pipes and wires through
Outside wall lights etc.
Pipes for rain water from columns
Pipes through ceiling for central vac
The holes will come up in the wainscoting. Use 4" holes so they can also take some wires.
Hole for mudroom fire chimney
Recirculation air for living room fire
Even though the air comes from the living room and is returning to the living room, the fan needs to be in the basement ceiling in order to avoid fan noise.
Central vac hole near living room fire for ash
Suck the ash to the mud room. Vac is in the mud room. Pipe needs to withstand hot ashes. This would be a dedicated 12 gal shop vac. The on off switch will be near the fire.
Alcoves completely through internal concrete walls
Where there is a 2-by framed hole, 1/4" plywood will be the only thing that blocks the square hole. Make sure the holes are appropriately sized and positioned so as not to compromise the structure. Need to fit between the vertical rebar and only cut through a max of one piece of horizontal rebar.
Need holes behind the kitchen counter to be able to install power sockets every 2 feet. The hole in the concrete is 7" wide which makes the gap between the 2-by a width of 4" which is what's needed for a double electrical box.
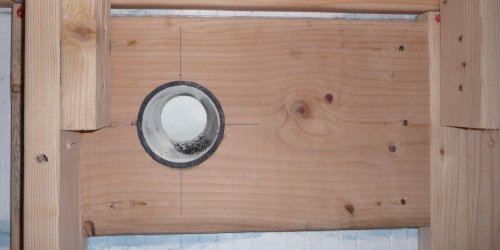
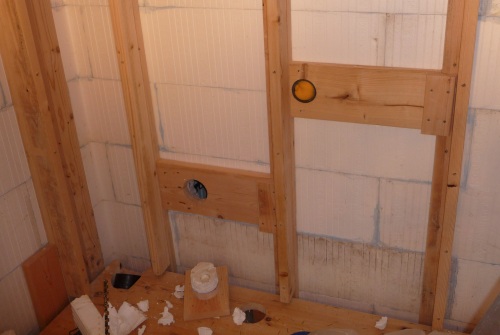
Implementing the holes
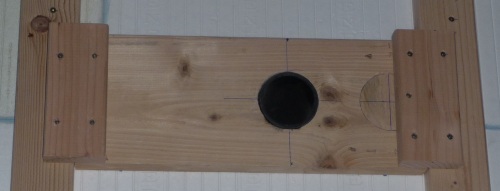
The holes are implemented using 4" PVC pipe that is braced on both sides using 2-by lumber.
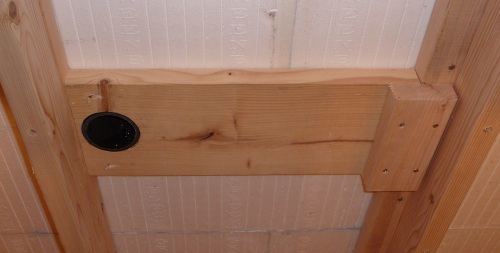
(The pictures show bits of 2x4 to sometimes attach to the vertical bracing, but it is better to just always toenail them to the batons using 3" screws in Kreg holes.
Cut 4" holes in the 2-by lumber using a 4" joining collar as a marking template. The hole needs to form an interference fit with 4" pipe.
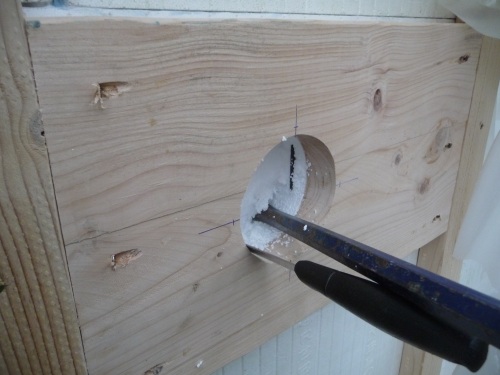
Screw in place the bracing lumber on the inside of the wall. Cut the wall polystyrene around the hole and dig out the circular piece of polystyrene. Be careful not to let bits of polystyrene fall into the wall cavity.
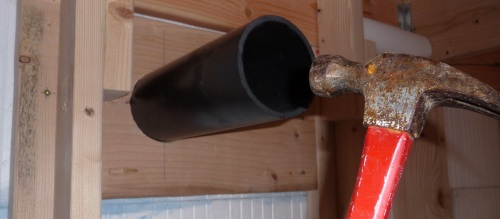
Use gentle hammering to fit the pipe after the braced holes have been made.
Temporarily fill the holes with eg sponges.

Mounting bolts for railings around ceiling openings
These are stainless steel bolts with stainless washers.
Mounting bolts for railings around porticos
Mounting bolts for stair rail
Wall hung toilet mounting studs
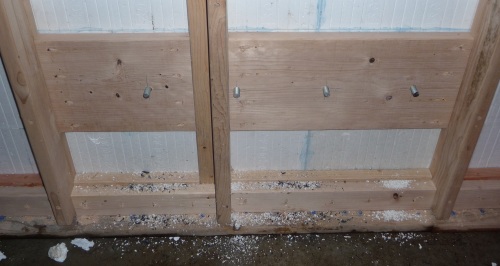
Inspection holes
Under all the windows and in strategic places in the walls it is good to implement inspection holes. The functions are:
Let air out during the pour
Let you see the concrete level
Let you poke a concrete vibrator into the wet concrete to
consolidate it.
A plug is fitted to the hole at the last minute as the concrete level rises. It is held in place using wood screws.
Inspect, brace, and repair EPS (Basement walls and ceiling)
Inspect the integrity of the wall EPS in detail to find anywhere the
concrete could leak out. If necessary make and apply lumber to brace
it.
Fill any holes with EPS glue or foam.
Thoroughly inspect all dimensions, window placement, etc
Inspection and double checking should have been done throughout the
whole wall building process, but do a final inspection for plumb,
level, true, etc as you won't be able to change things after the
concrete pour.