Home Site Map - Techniques - Structure -
Carnation Flooring
![]() A
robust poured concrete floor forming system that strengthens
the overall building.
A
robust poured concrete floor forming system that strengthens
the overall building.
Because it is integral to the walling process, the details of using Carnation Flooring is described previously as part of doing the Carnation Walling. It is described here . This page is for people that want to know about Carnation Flooring in isolation.
Form wet concrete into beams
The floors will be formed using poured in place concrete. To do this it is necessary to have something that will form the wet concrete into beams. Expanded polystyrene (EPS) can be cut to a shape that produces the forms for the beams. The EPS also stays permanently in place to provide sound insulation (and heat insulation) between floors.
Expanded polystyrene (EPS) is made as large ingots that are typically then cut up into sheets using a large computer controlled (CNC) hot wire cutting machine. If you feed that computer system with a suitable program it can, instead of cutting straight sheets, cut whatever profile you want. The ingots of manufactured EPS that the CNC hot wire machines take are typically just over 4 foot wide, 3 foot high, and 8 foot long.
Carnation Flooring is my own design of profile that I want the CNC hot wire cutting machine to cut to. The flooring EPS is 1 foot high, so I can get 3 sections of 4 foot wide 8 foot long flooring out of a 3 foot high ingot of EPS. The details of the cut dimensions can be seen in the cross section diagram below.
The floor is constructed by supporting the 8 foot long by 4 foot wide sections of polystyrene on lumber beams that fit into the smaller slots on the bottom. The wood beams (and the temporary props under the beams) are just to support the weight of the wet concrete and any construction workers. Once the concrete has set then it is the formed concrete beams that take the load. Rebar is laid in the beam cut-outs prior to pouring concrete so the beams are fully strengthened.
The wood beams are 10-1/2" tall and 3" wide. They can be made using two wood beams that are 5.5" tall and 3" wide that are then trimmed to 10-1/2" tall. I make the visible part of the beam on my sawmill. The timber is sawn fresh from the tree so the beam will shrink in width and height as it dries. On the sawmill the beam is cut to be 3+" width and 5-1/2+" where the plus denotes an extra 1/16th of an inch. After drying the expectation is that the beam will be about 3-" and 5-1/2-" where the minus denotes a 1/16".
The above method is the best way of implementing beams that are left visible, but here's a complete list of ways of implementing the beams...
1) Use a 5.5"x3" beam on the bottom and joined 2x6s on the top. After the assembly is glued, trim it on a table saw to be 10.5".
2) 2x12 lumber glued together to make 11" tall beams that are at their widest 3" with the joins. The beam is then trimmed to be 10.5" tall. Laminating a double layer of 2x12 lumber means they can be formed to any length without having to worry about what lengths of lumber are purchased (typically 2x12s are 16' long). The double layer is only actually needed for about 4' either side of the join. Where not near a join, the width can be padded from 1.5" to 3" using bits of 2x4 to keep the beams tight in place in the cut EPS.
3) Use TJI-110 wooden I-Beams with 3"x1" blocks on top. If using TJI-110 I-Beams then 3" wide 1" strips are used on top to pad them out.
Even though the lumber is not structurally required after the concrete has set, it is good to keep the wood beams. Even though the concrete floor will never fall, some people will find it comforting to know that there are also wooden beams holding up the floor.
I prefer visible beams but alternatively the beams provide a good nailing surface for ceiling drywall. The beams extend almost 6" beneath the EPS. The EPS can provide a cavity for running pipes and wiring etc. In the case of visible beams you will only be able to run pipes east west and that requires cutting a channel into the underside of the EPS.
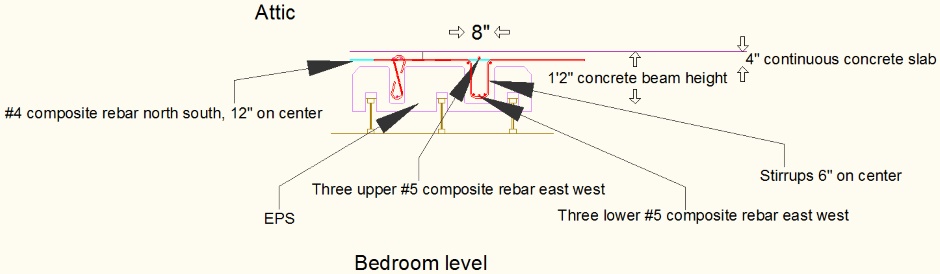
As well as filling the big cutouts in the top of the EPS to form beams, the concrete also covers the whole floor area to a depth of 4" above the top of the EPS block. This forms a continuous concrete floor with integral concrete beams underneath it. As well as having rebar and rebar stirrups in the beams, there is also a lattice of rebar in the 4" floor concrete.
Cross Section
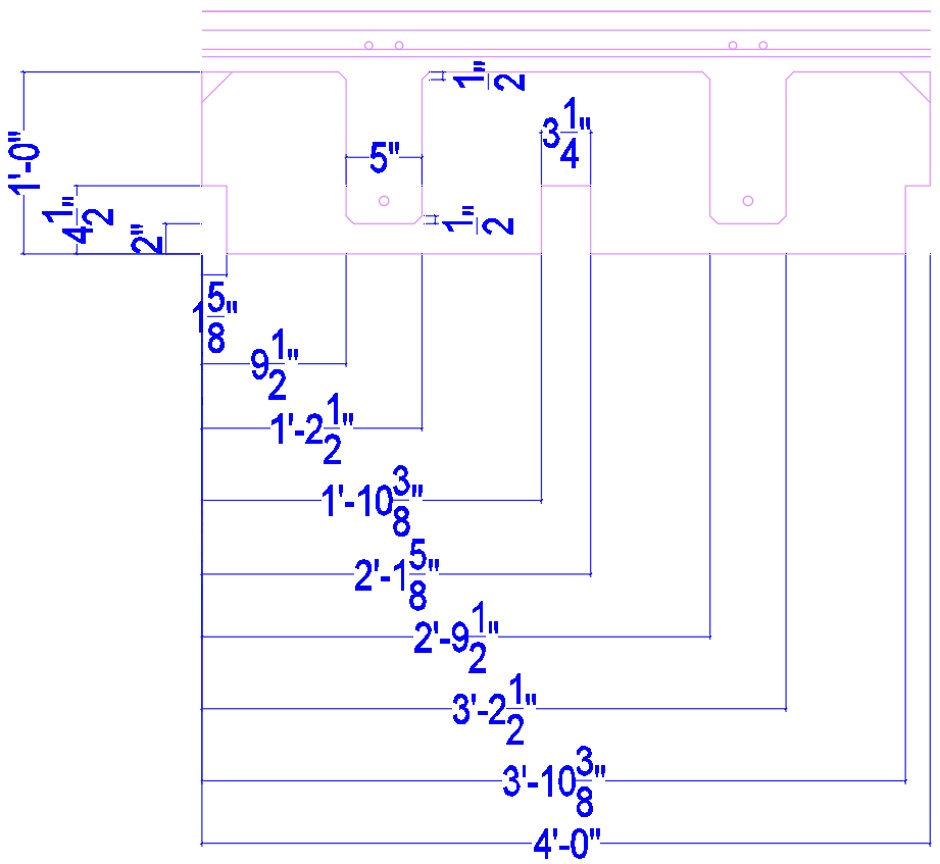
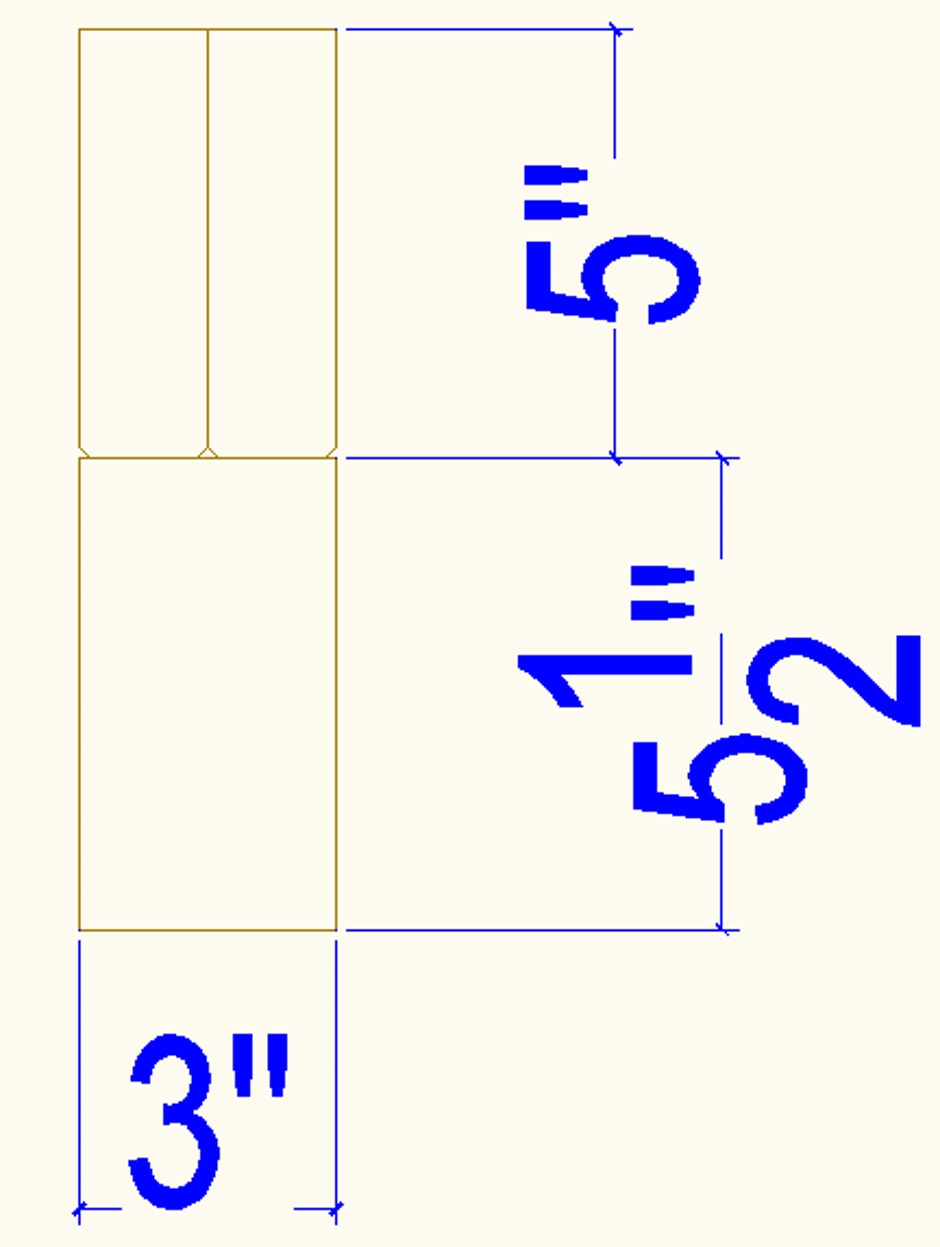
The cut-ins on the bottom are 3" wide and are to take up to two widths of 2-by lumber. The larger cut-ins at the top are 4" wide and form the concrete beams.
Where necessary, 90 degree corners are avoided so there are no sharp direction changes in the concrete that might introduce unnecessary stress in the concrete.
The overall block height is 12", so it possible to get three flooring sections (each 4' wide by 8' long) from a 3' high EPS ingot.
The beams formed are actually 14" high because the concrete goes 4" above the top of the EPS block.
The waste polystyrene that is cut out from the block are left in place when the cut EPS blocks are delivered and can be used for general insulation, eg in the house roof. The waste blocks for the concrete beam slots will be 10"x4"x8'. Just need to cut off the top corners with a craft knife. The waste blocks for the lumber beam slots are 5"x3"x8'.
Rebar placement
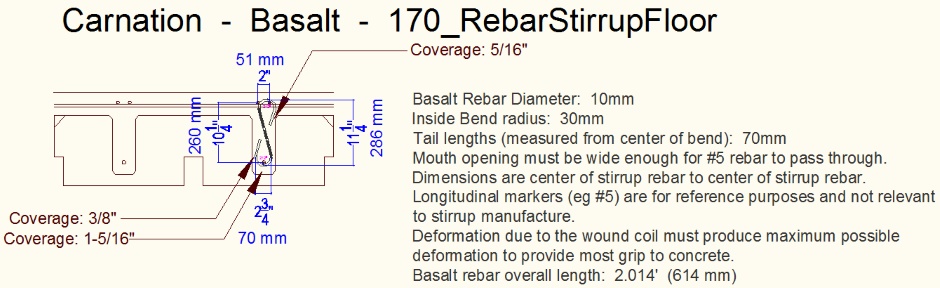
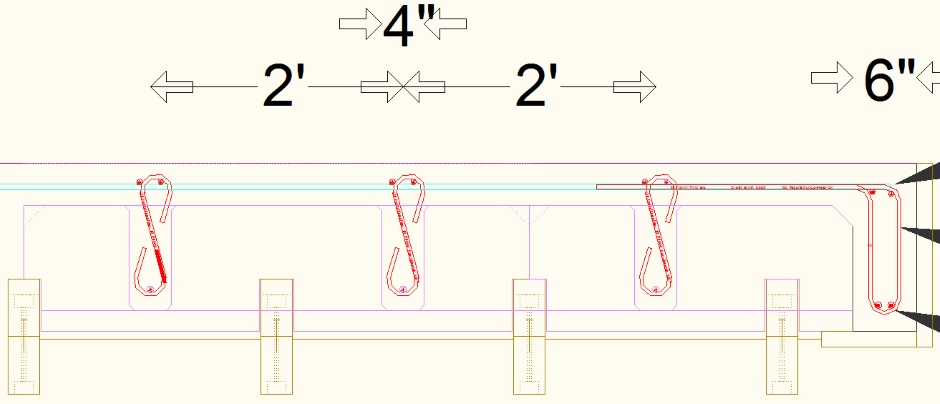
The flooring EPS forms 4" wide beams that are 1'2" tall. At the top of the beam you need two half inch rebars and at the bottom of the beam you need one 5/8" rebar. Between the top and bottom rebars a rebar stirrup is used.
Because of the minimum bend radius required by American Concrete Institute guidelines it is not possible to provide much concrete coverage for the stirrup in the 5" wide beam so it is important to use rebar that does not corrode. The best choice is basalt rebar and that's what I use.
Another important function performed by the stirrup is that it holds the 5/8" bottom rebar in the right location. At the top it hooks over one of the half inch rebars and is cable tied to the other top rebar.
The stirrups are 24" on center in both directions.
In the floor slab running north south there are also half inch rebars at 12" on center. They are under the twin half inch rebars that run east west.
EPS profile manufacturing
Most companies that manufacture EPS (in large computer controlled vacuum chambers) also have computer controlled hot wire cutting machines. All you need to do is come up with a control program in the right form for the particular make of CNC cutting machine. Typically the EPS company will have someone that can help translate your cross section diagram into the necessary control program for their cutting machine.
You will want to find an EPS manufacturing company that is geographically fairly close to you to avoid high transportation costs. In my case the company I chose was North West Foam that is in Twin Falls Idaho. (There is another company who is actually much closer, but their prices are much higher because they only sell via distributors.)
North West Foam
2390 Rostron Circle, Twin Falls, ID 83301
Ph. 208-734-7426 Fx.
208-736-8690
info@northwestfoam.com
I send them an AutoCAD drawing of the profile.
The EPS does not need to take much compression force, so it would be ok to specify Type I EPS (Standard 1lb density with some regrind), but I prefer to use Type II.
Assembly and temporary floor bracing and support
The installing of the flooring to form a ceiling for the house level below is actually done in conjunction with doing the Carnation Walling so see that page for more details.
The 10.5"x3" beams go in the East-West direction. Their ends are supported by the internal walls and the west and east outer walls of the house. Actually during the concrete pour the beams sit on 2x6 beams that run north south with props underneath. It's best to get nice straight lumber, but where there is a slight curve then the curves (the crowns) are arranged to be upwards.
Alternatively you can use wood I beams (TJI-110). These are 9.5" tall and 1.5" wide so you need to use on top 1" spacers that are 3" wide. The TJIs cost about $1.38 per foot. I need 22' 3-3/4" for the middle section of the house (when there are no floor openings) and about 17' for the outer sections.
The beams will be installed ahead of the EPS Carnation Flooring (and of course ahead of the concrete pour). The EPS Carnation Flooring will be fitted to the beams from above. Ahead of the concrete pour, the lumber beams will be supported by the 2x6 lattice. Internal lumber walls are used to stop the 2x6s and therefore the 10.5"x3" beams from sagging ahead of the concrete pour and while the concrete is setting.
When using the Carnation Flooring system for decking and internal landings that do not have a wall to support it at the edge, then manually form a beam at 90 degrees to the pre-cut channels so that the edge is properly supported. It will need a wooden concrete form board along the outside to form the outer part of the concrete beam. Hand rail posts and landing balustrades will be attached into this concrete edge beam.
Other info
The concrete walls and the flooring above that story of walling (ie the ceiling) is all done as one concrete pour. There is no concrete joint between the walls and the flooring - it all just flows together to form a monolithic unit. The rebar from the floors goes down into the walls.
The flooring is also a bracing system (for use before the concrete pour). The presence of the flooring helps stop the walls from tilting in or out and also holds the building square.
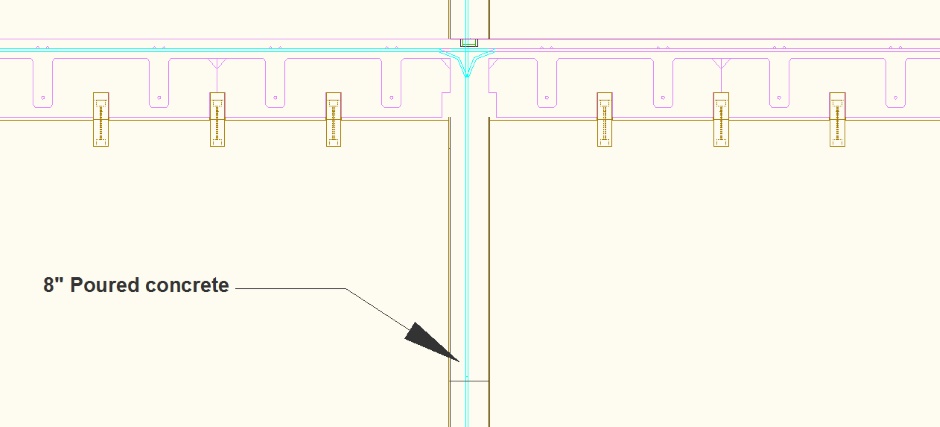
Connection To Wall
The following diagram shows how the flooring connects to the concrete walls at the side of the building. In most cases either decking or a balcony is on the exterior. Shown below is the connection to walls that run east west, but the north south walls are pretty similar.
.jpg)
.jpg)
.jpg)
Connection To Internal Wall
Floor opening and deck edge lips
At the edge of floor openings and at both inside and outside deck edges a cowhead stirrup is used.
Note that when the wood support beams run in the other direction the wood beams cannot go past the concrete lip.
Extra floor beam under attic sheer walls
In order to take the extra load from the shear walls above, a wider beam is cut into the Carnation Flooring used for the attic floor.