


Home Site Map - Techniques - Structure -
Carnation Walling - Ceiling Beams
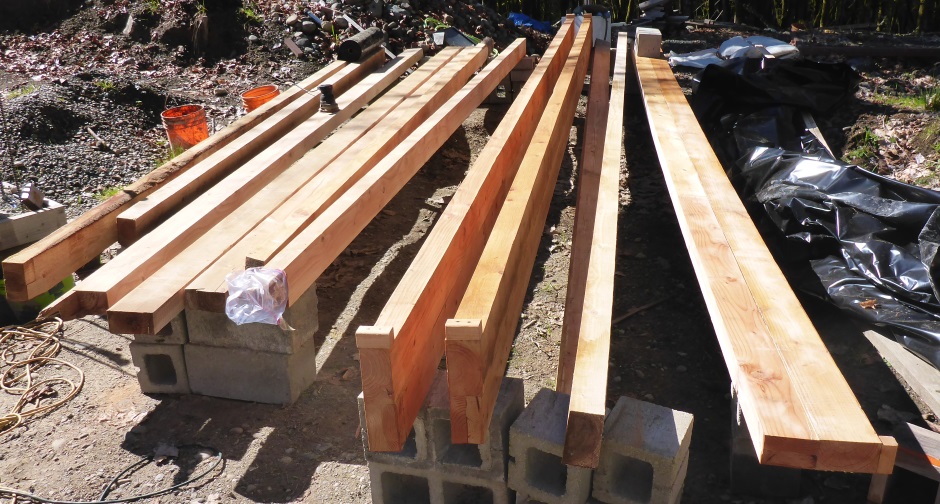
![]() Implement the wood beams onto which the flooring block will sit.
Implement the wood beams onto which the flooring block will sit.
Move vertical batons to final position
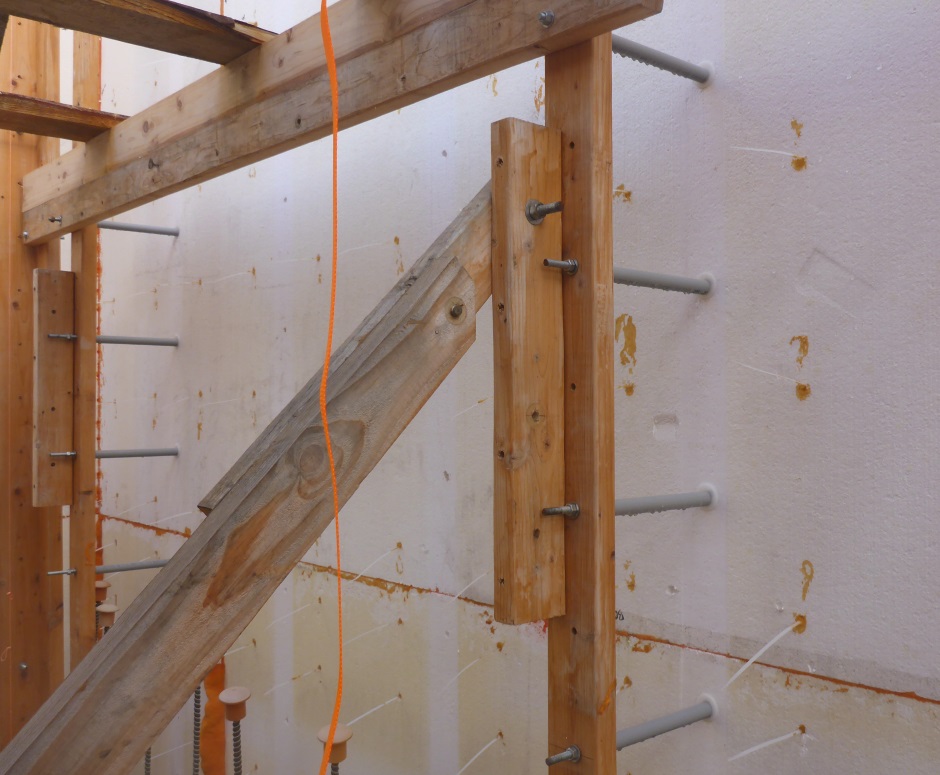
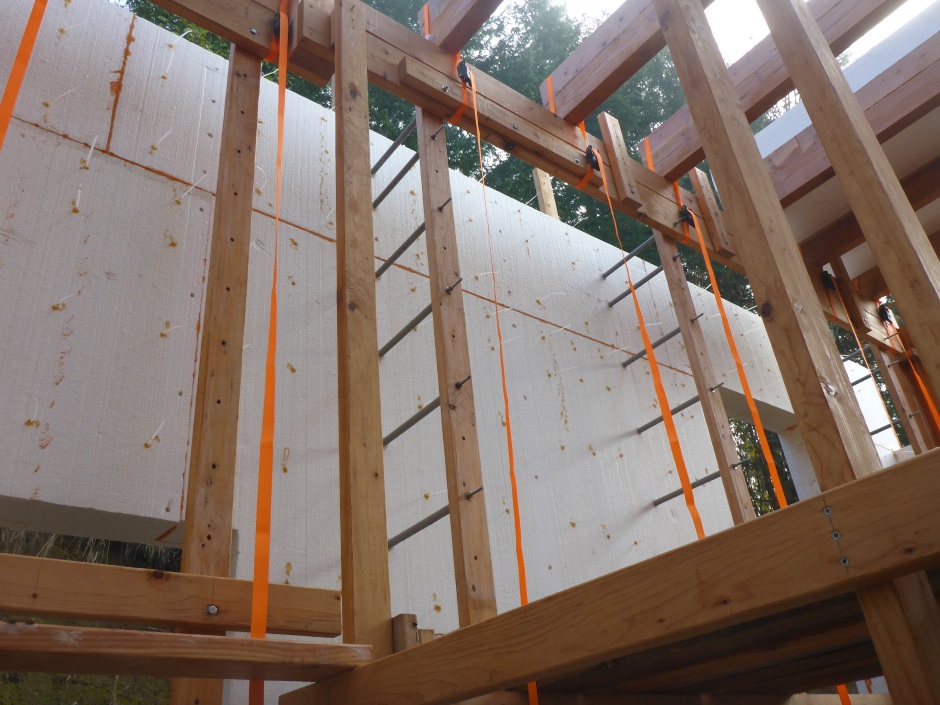
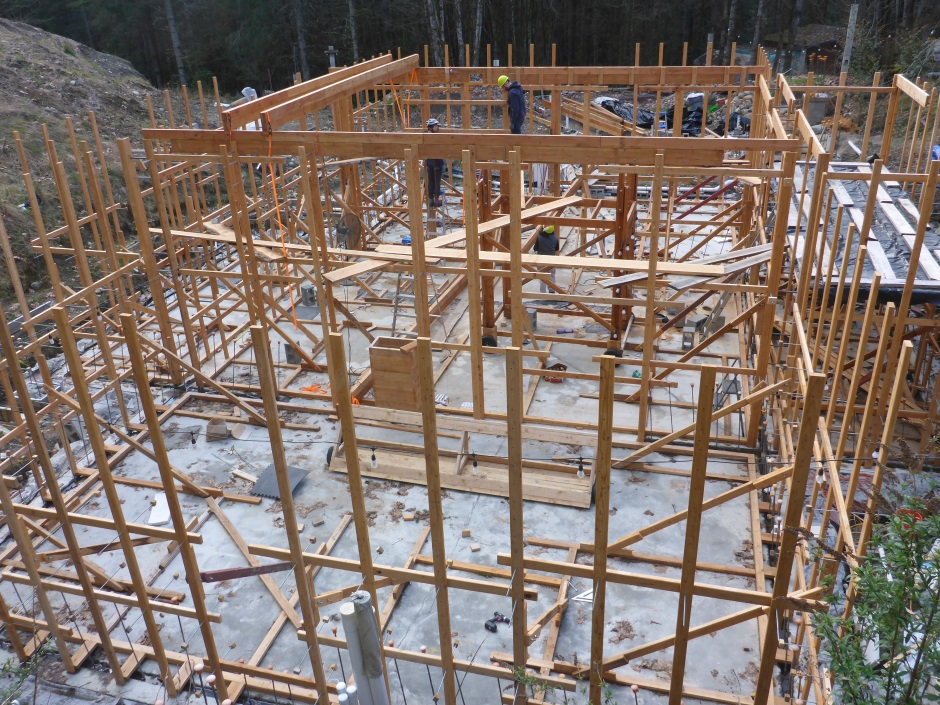
The inside vertical batons are currently against the 6" EPS which is where the concrete will be. For the section of wall to be worked on, remove all the inside vertical batons and the tie rods.
In strategic places put a vertical baton in the final inside position. Typically choose a position that has a 45 degree angle brace. In selecting which few places to put a vertical baton, think about what is necessary to support the rebar in the right places. This will be influenced by where the window openings are. You want to have only a few batons so you have room to get the rebar and plywood into place.
You will want to put vertical batons at the primary locations closest to the corners and these batons are the least likely to get in the way of adding the rebar and the plywood.
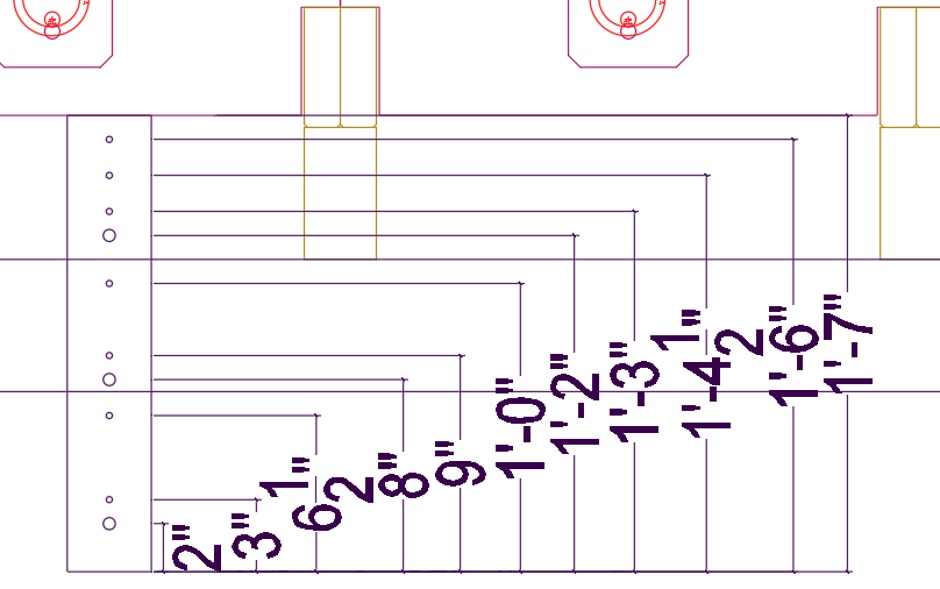
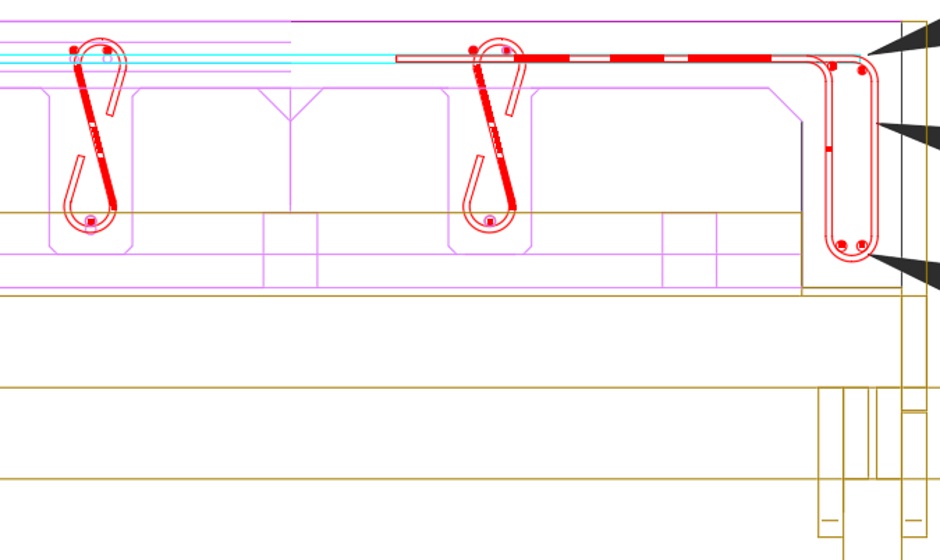
The following diagram shows the tie rod arrangement at the bottom of the wall.
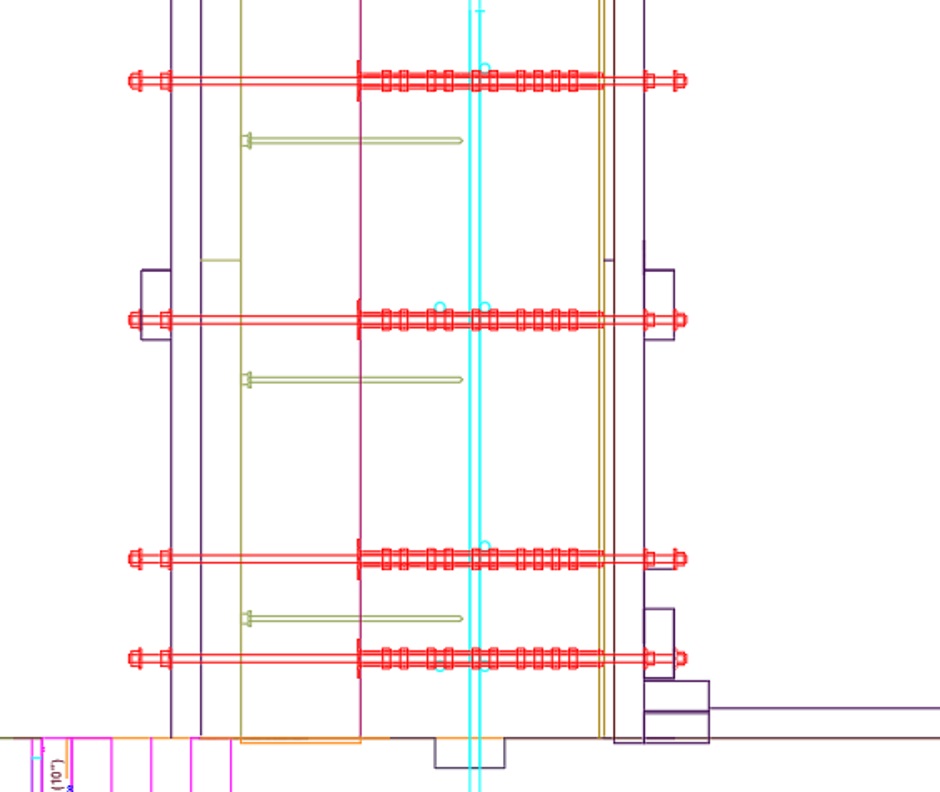
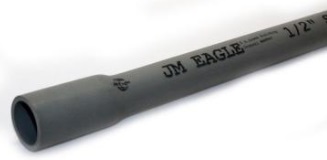
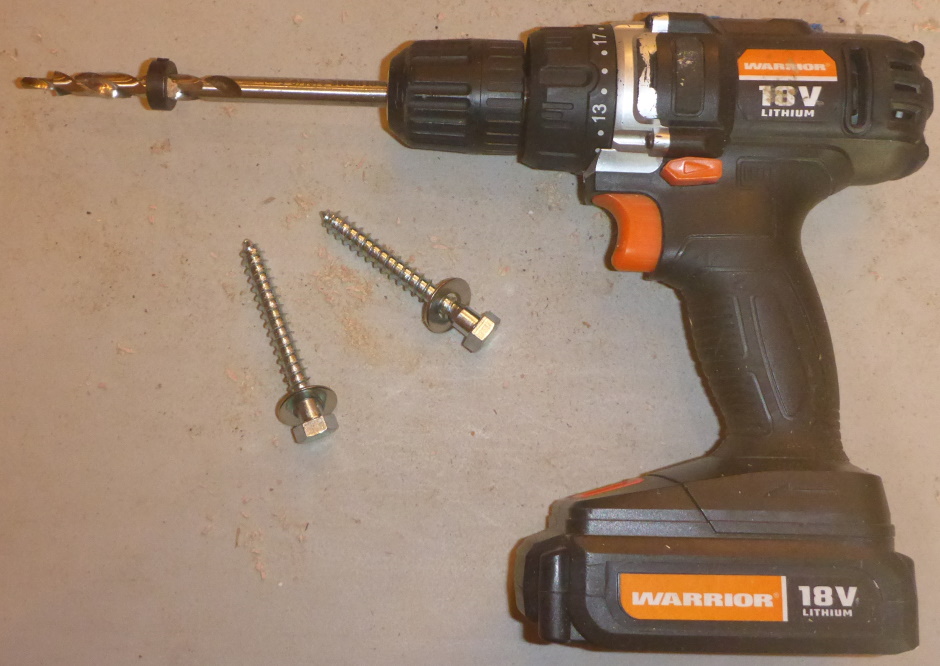
For 8" concrete walls the conduit is cut to a length of 8-1/4". For 12" walls it is 12-1/4". Electrical conduit plastic pipe is used because it is low cost. It is 1/2" diameter.
Getting the length of the plastic tube right is important. The calculation is...
Cavity width - 1/16" for washer + Expected compression of EPS (1/8") + expected compression of plywood (1/16") + How much less thin ply is from 1/4" (1/16") + How much less thick ply is from 1/2" (1/16").
For an 8" cavity that means 8 - 1/16 + 1/8 + 1/16 + 1/16 + 1/16 = 8-1/4".
Use a length stop jig on a chop saw to cut the conduit.

Add threaded rods, Corrosion Proof Large Washers, and lengths of conduit at all the X'9" places up the vertical baton and also at the 4" place at the bottom. You will need to drill a hole through the EPS (using the wood baton as a guide) so that you can add the 4" from the bottom tie rod.
Given that the 1/2" + 1/4" plywood has not yet been fitted you need to add an extra 3/4" length of conduit to form the correct distance. You only need to do this in a few places (eg at mezzanine floor height and at the top) and wherever it happens to be easy to do. It will be hard to do and is unnecessary near the bottom. At the bottom, the nailed down kicker board holds the bottom of the vertical baton in the right place. When there is not the extra 3/4" spacer, leave the nuts loose on the threaded rod. When there it a 3/4" spacer do the nuts up but still avoid compressing the washer into the EPS.
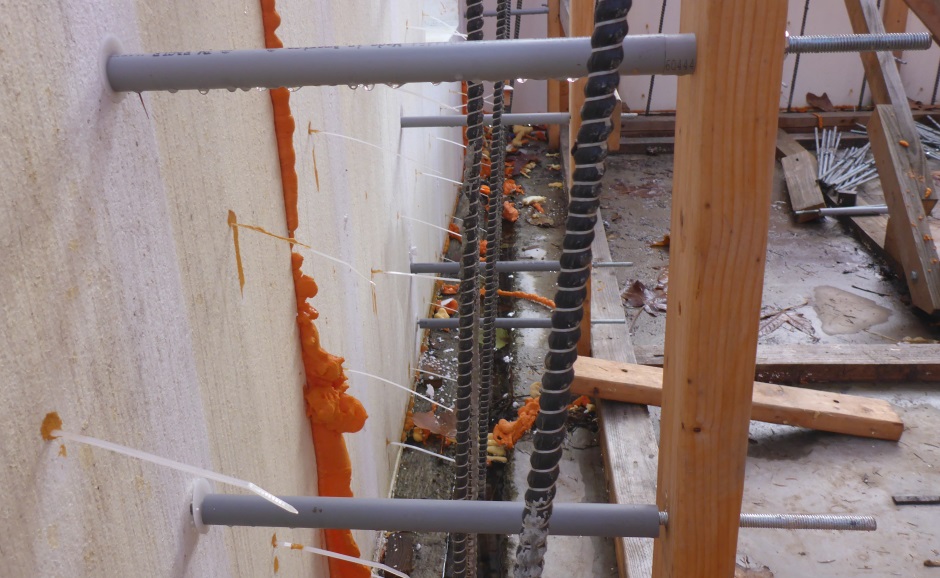
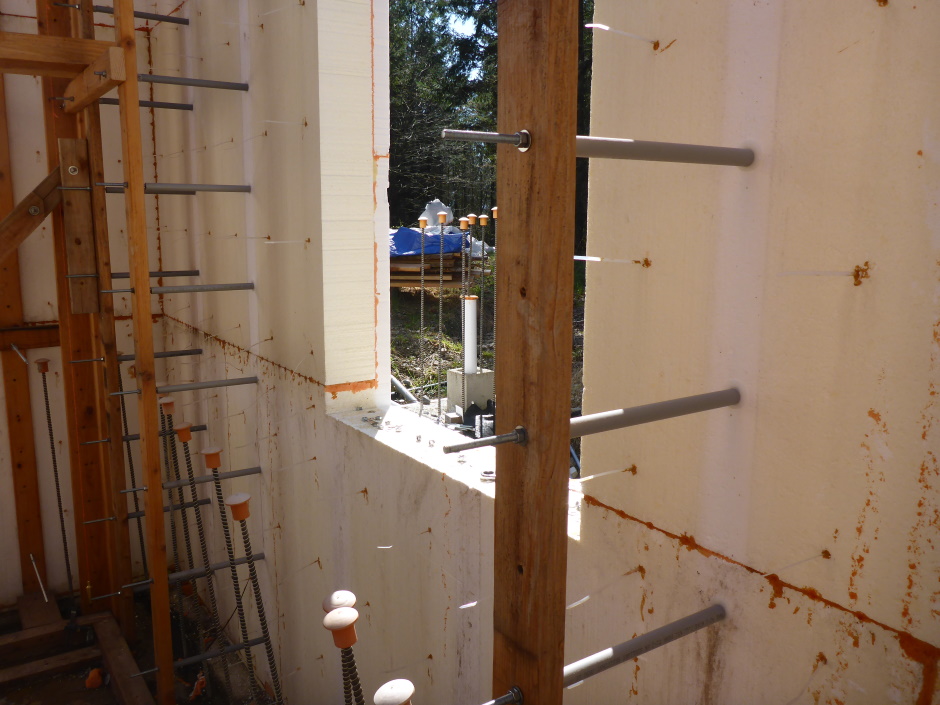
Drill any X'3" holes and fit extra tie rods
Above and below the windows you will need rebar in the X'3" hole positions, so these holes for tie rods need to be drilled (with the EPS already fitted).
You will need a vertical baton in primary positions on both sides of the window/door opening. These batons will need the X-3" holes drilled at the top and bottom of the opening and will need tie rods fitted.
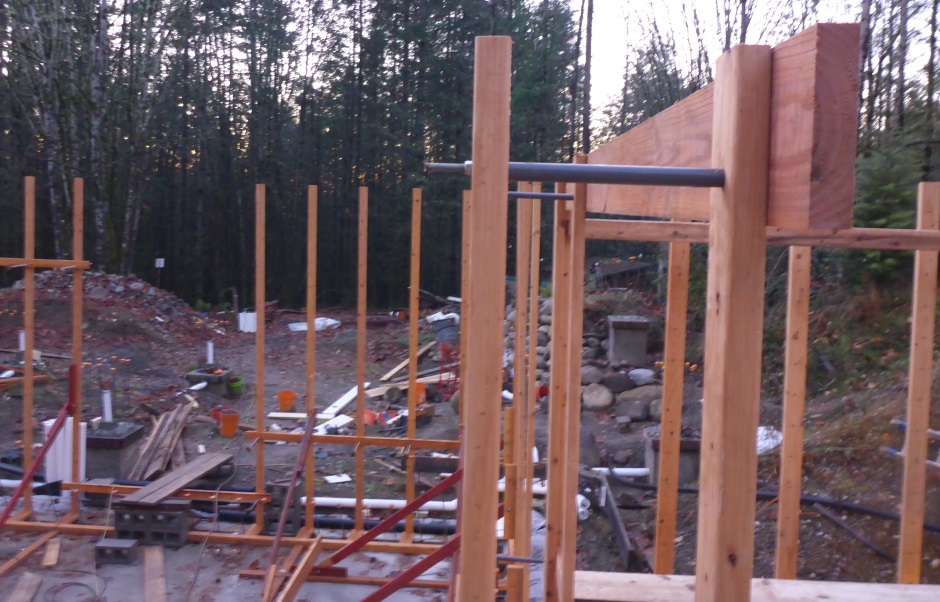
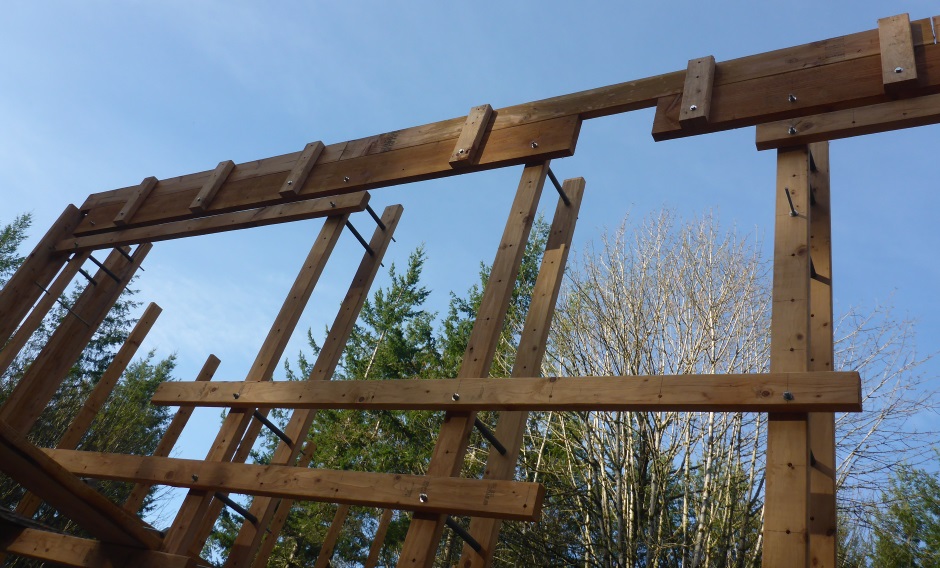
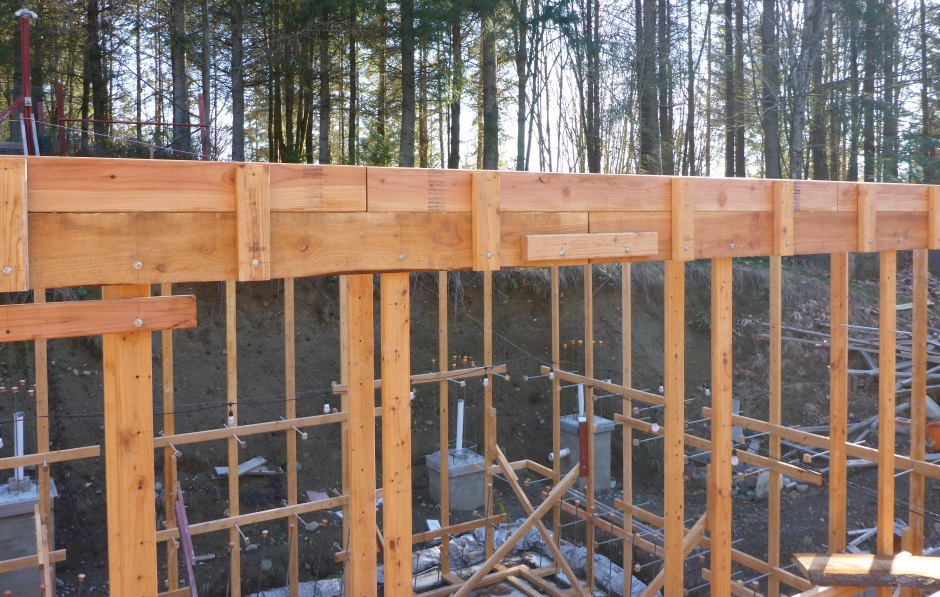
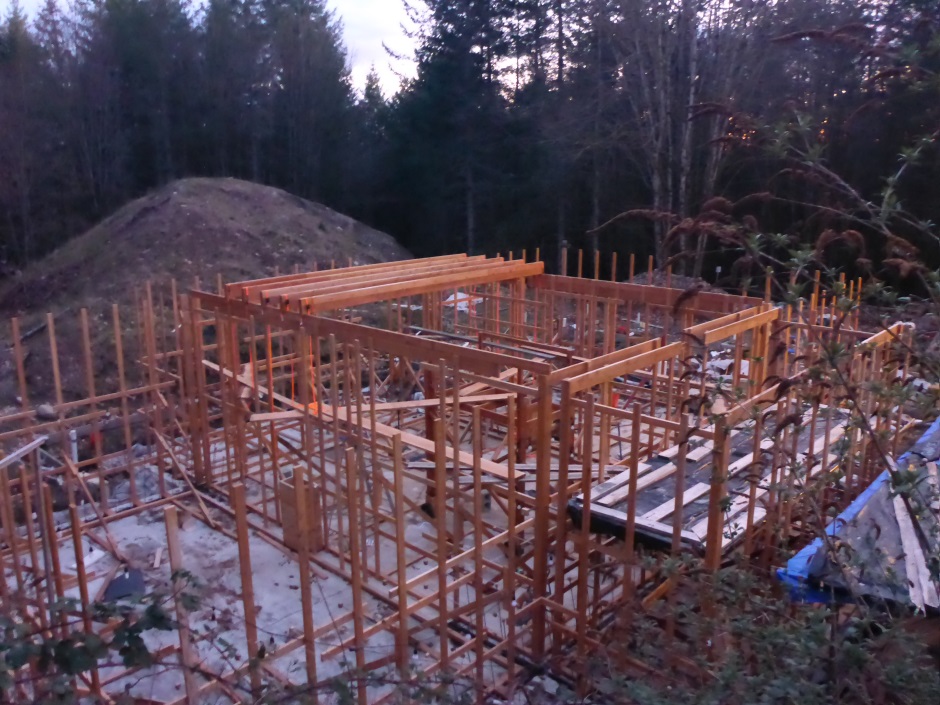
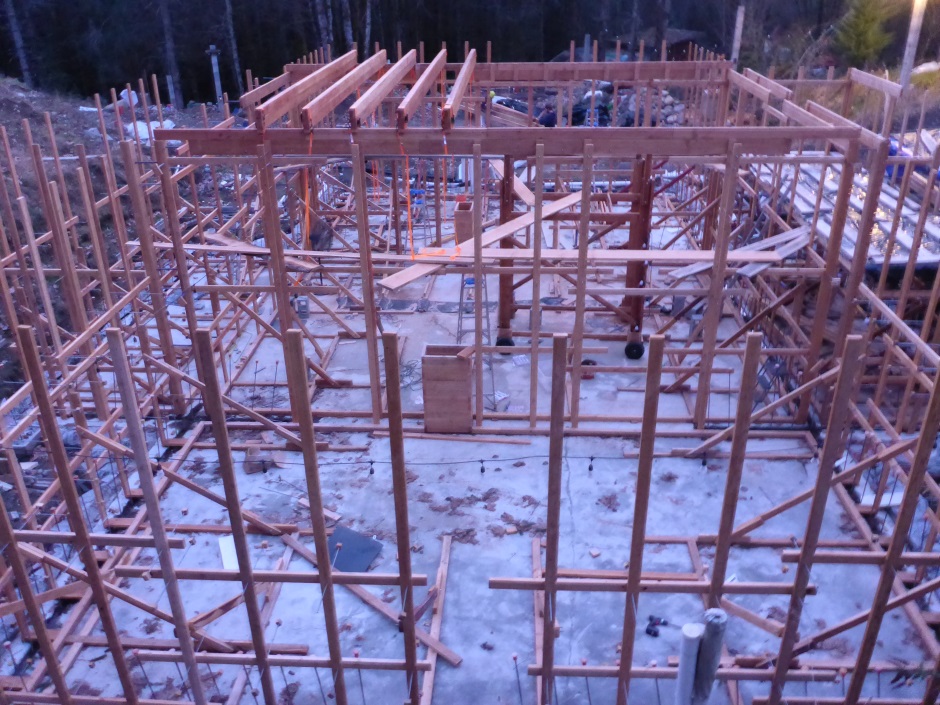
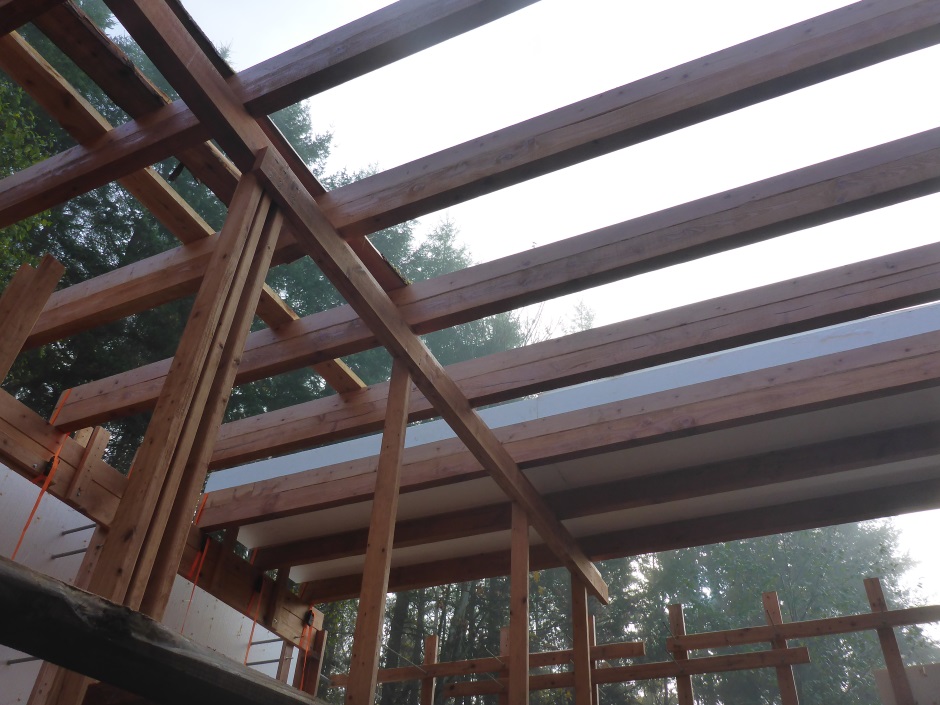
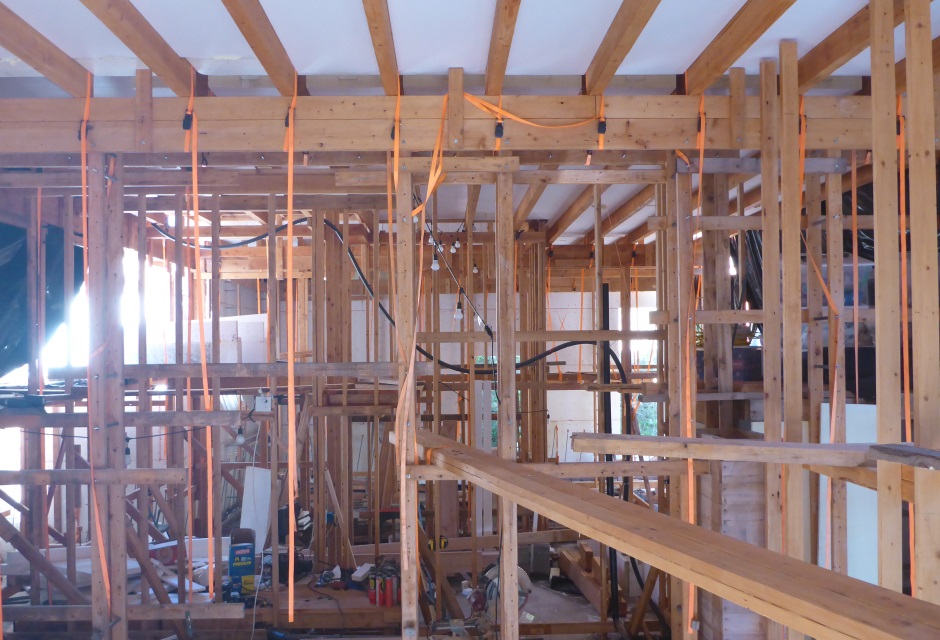
Support for the ceiling beams
We want to get to a rain-proof enclosure as soon as possible so it is more pleasant to work and the materials stay dry.
The 12" thick EPS blocks that form the concrete flooring are supported by 10.5 inch tall wood beams that are in turn supported by 2x6 lumber (1.5" x 5.5"). The 2x6s are supported by a horizontal 2x8 baton that attaches at the top of the vertical 2x4 batons.
You will have previously implemented wooden internal divider walls. These are used to provide a support for the main beams somewhere along thir length to help with the weight of the wet concrete that will be poured on the floor.
Make 2x8 batons
You want these to be fairly long (say 10, 12, or even 16 foot lumber) so that less vertical 2x4 batons are needed to support them. Decide on the lengths based on where there are vertical batons in their final inner positions. You will want to use good straight lumber. If there is a slight box when for consistency always mark out on the concave side.
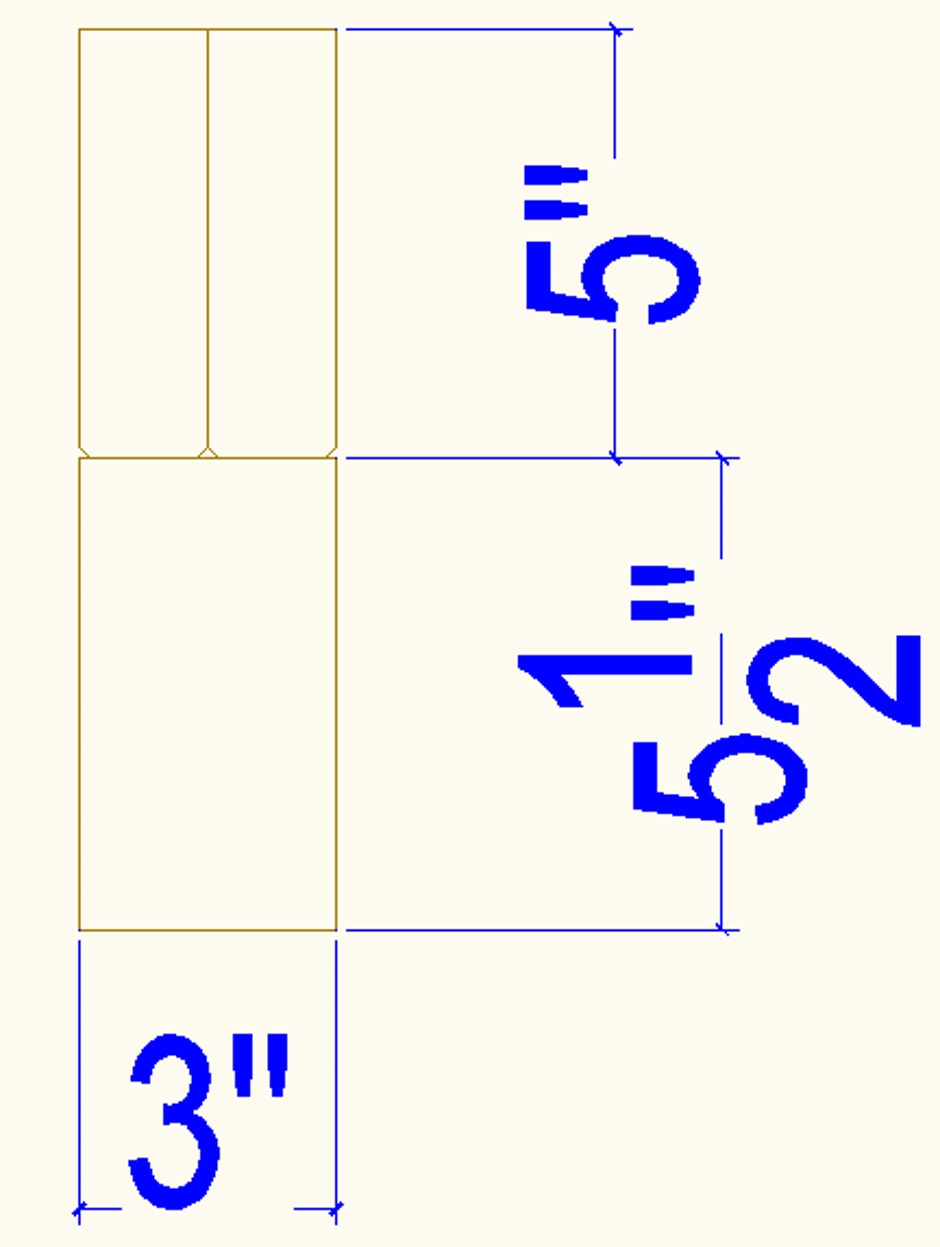
In the case of horizontal planks running north south the 1" from the end holes bolt to the 2x6 corner verticals. In the east west case, they need to start at the first vertical 2x4 baton rather than at the 2x6 corner assembly to avoid a clash.
The holes are 5-1/2" from the top edge (the top edge is the important edge).
They are needed for both the north and south walls and the east and west walls. Also on the tops of internal concrete walls.
Here's the north south 8" cavity version...
And here's the north south 12" cavity version...
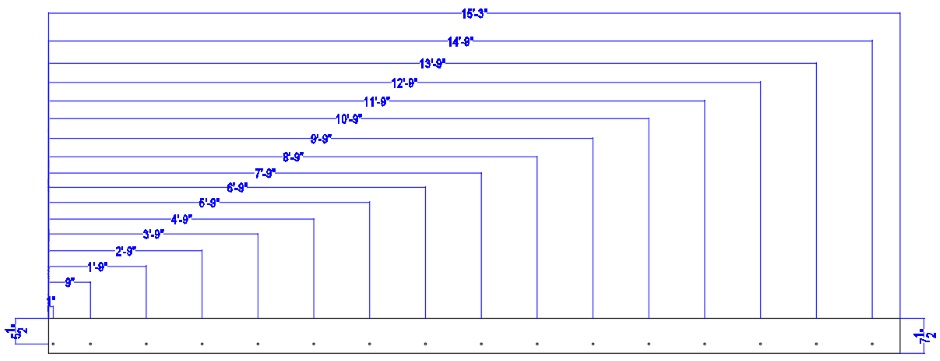
The actual lengths depend on the length of the wall section and available lumber so you can shorten the lengths in 1 foot increments as required (cutting 6" - 1/16th" from hole position).
Some creativity may be required based on what lumber you have and where the vertical batons are. This is fine as long as you keep looking at your CAD drawing.
Note that when spanning the center of the building, the hole pattern changes - again consult your CAD drawing so you get the holes in the right places.
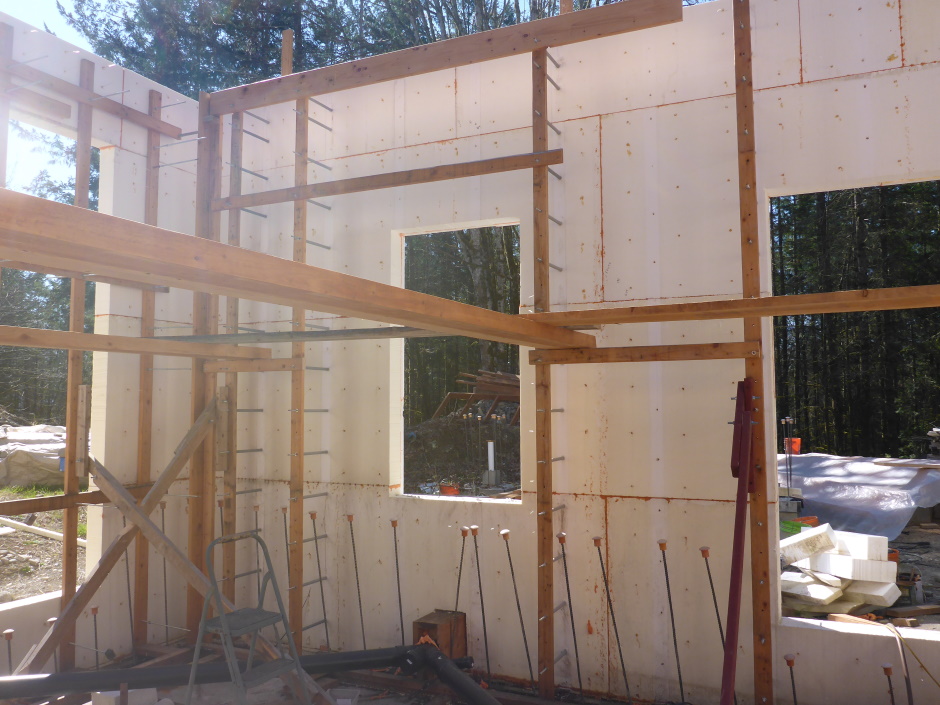
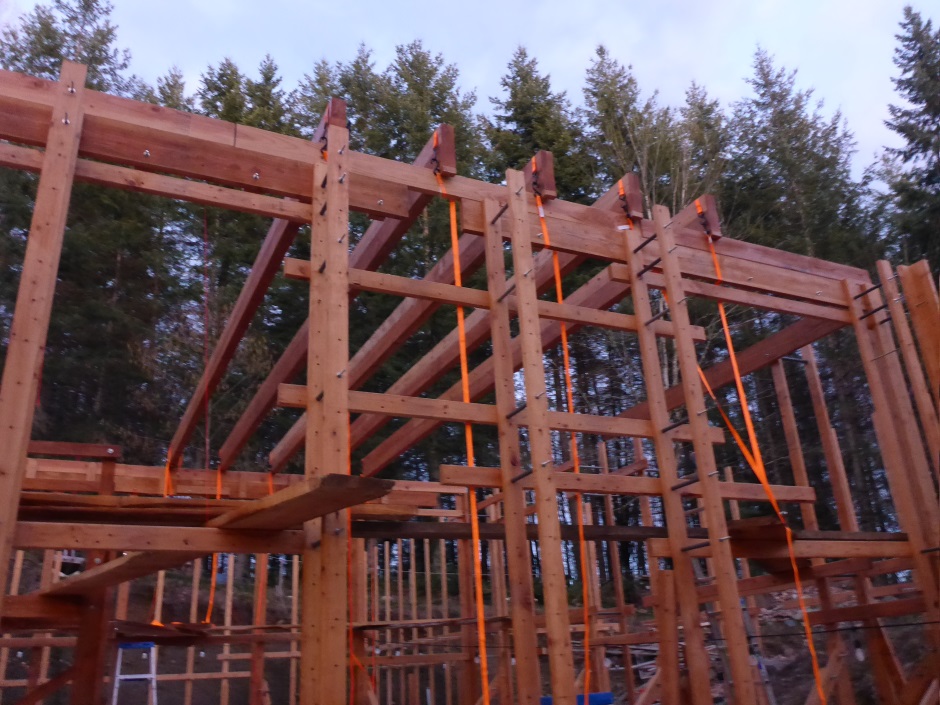
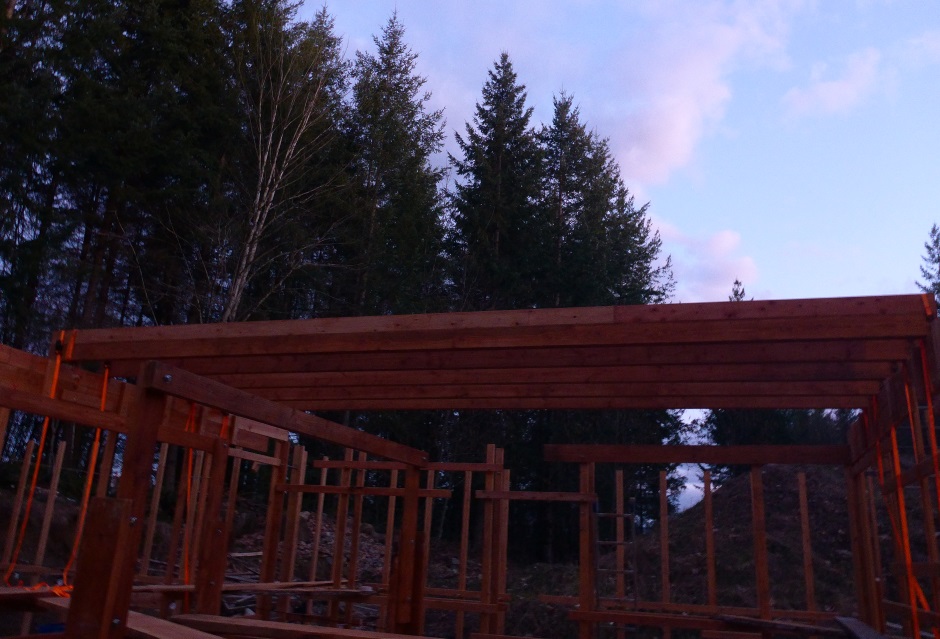
Fit horizontal 2x8 at the wall
The 2x8 on the north and south walls (run east-west) are for supporting 5.5" high lumber that then supports the main 10.5" tall ceiling beams. 2x8s are also used on the east and west (run north-south) walls so that with 2x6 padding they support the ends of the main 10.5" ceiling beams.
Add a few strategic vertical 2x4 batons on the north and south walls in their final position, but not too many or they will get in the way of adding the rebar and plywood. Do not put them anywhere that will interfere with the windows and doors. Typically put a vertical 2x4 batons in the primary location near the wall corner.
Attach the horizontal 2x8s at the top of the vertical 2x4 batons using the X'3" holes and 3/8" threaded rod wall ties. For the attachment to the 2x6+2x4 corner assemblies it is best to use 3/8" bolts as the holes for tie rods have not yet been drilled in the EPS.
Also add the 2x8 horizontal beams on both sides of the internal walls.
It is ok to have a few gaps between the 7.5" tall horizontal planks. The 2x6s that go on top will span the gaps.
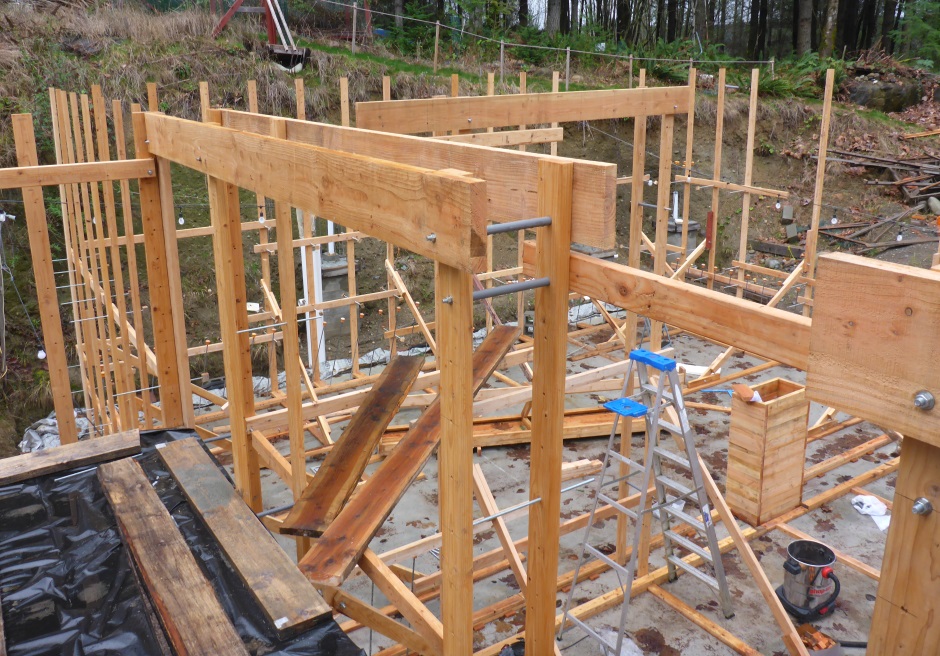
Install 2x6 planks on the 2x8 planks
Depending on the length of internal 2x4 vertical batons, you may need to use short pieces of 2x4 to hold the 2x6 lumber on top of the 2x8 lumber. This forms the edge on which the 10.5" main beams will sit. If you need the extra 2x4 pieces then position them at the secondary locations.
Where there is not a clash with the location of a 10.5" main beam you can actually use longer pieces of 2x4 to go up beyond the bottom edge of the 10.5" main beams.
Less good is to use shorter pieces...
Internal concrete wall openings
Where there is a designed in hole in a concrete internal wall that is actually going to be filled in by wooden internal walling then this internal wall can also be framed at this time as it will be used to support the wet concrete of the wall.
Mark beam positions on top edge of 2x6s
From your CAD drawings, draw marks to show where the beams should be positioned on the 2x6s. The beam positions should be shown on your CAD drawings.
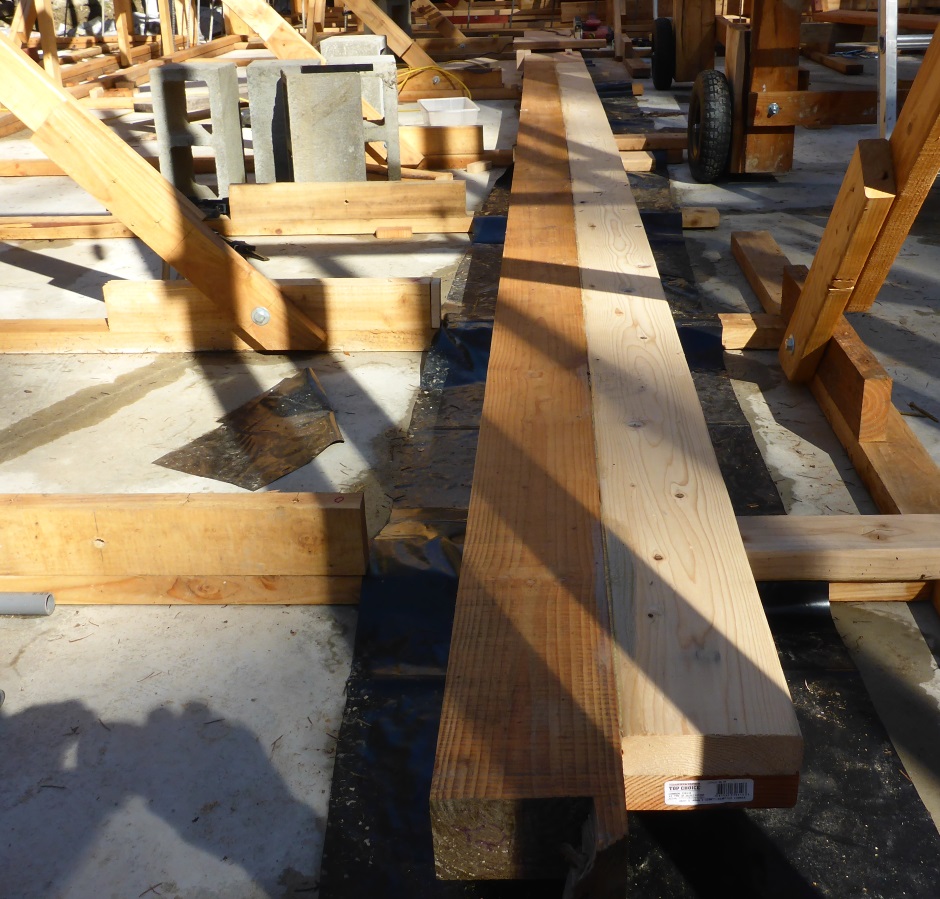
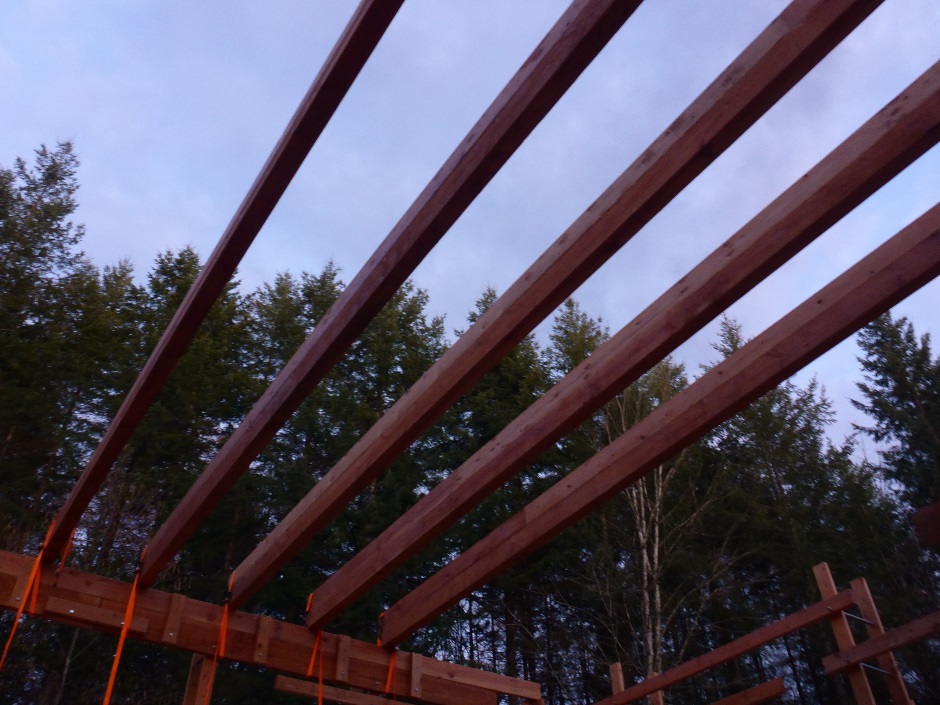
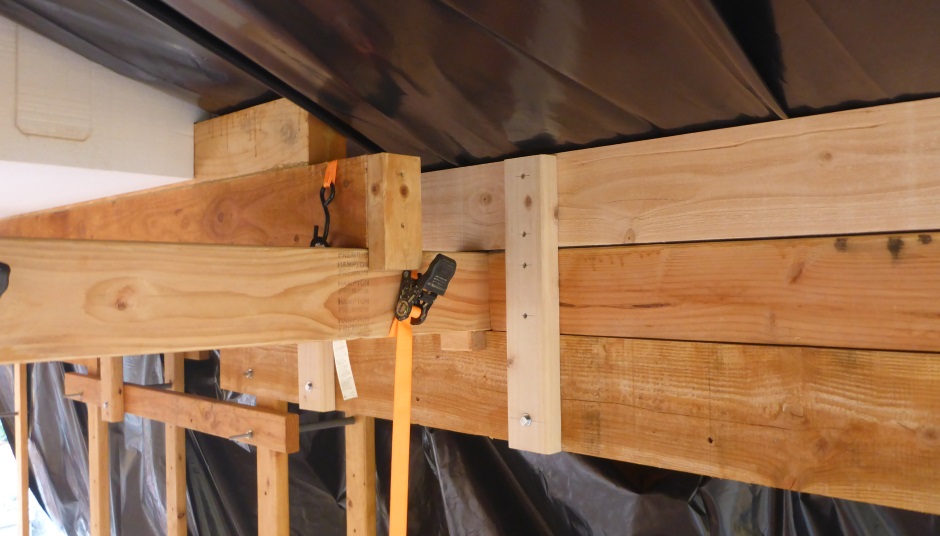
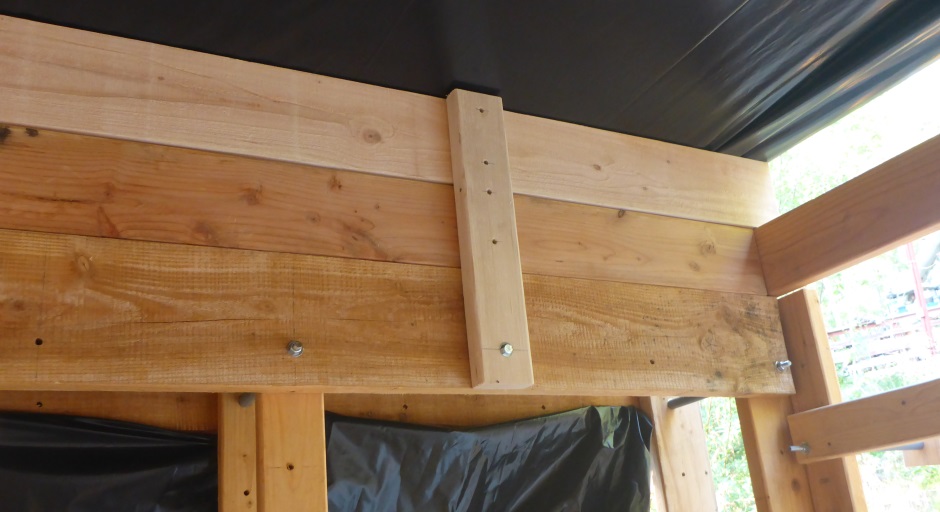
Make 10.5" floor beams
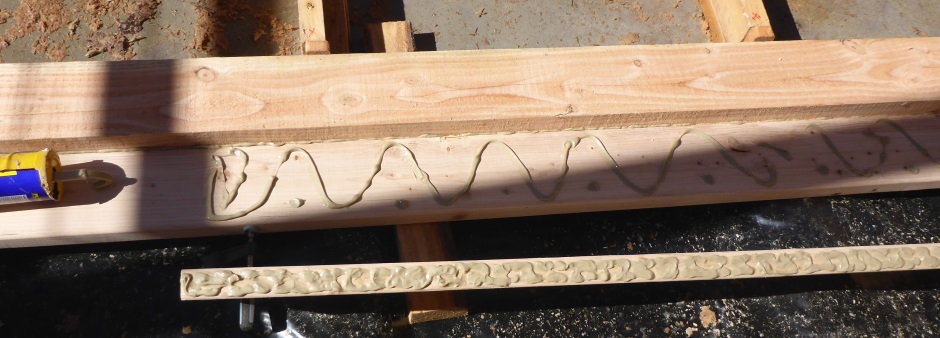
These beams will go into the slots in the bottom of the EPS Carnation Flooring blocks. They go East-West on the building. They are 10.5" tall and 3" wide formed from two beams that are 5.5" tall and 3" wide. After gluing the beams they are trimmed on a table saw to 10.5". The reason it is ok to use two 5.5" beams is that only the bottom 5.5" of the 10.5" beam will be visible in the finished ceiling. I use doug-fir timber cut on my saw mill for the bottom of the beam. The timber is sawn fresh from the tree so the beam will shrink in width and height as it dries. On the sawmill the beam is cut to be 3+" width and 5-1/2+" height where the plus denotes an extra 1/16th of an inch. After drying the expectation is that the beam will be about 3-" and 5-1/2-" where the minus denotes a 1/16".
I glue two 2x6s on top of the sawmill cut beam to form a home-made glu-lam beam.
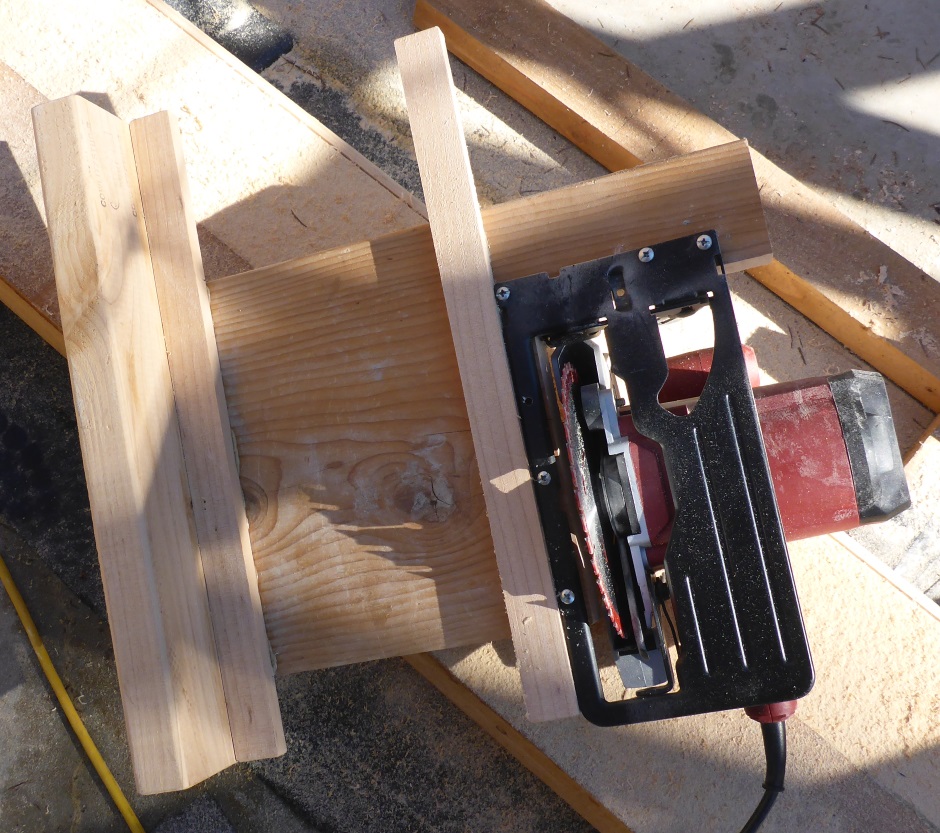
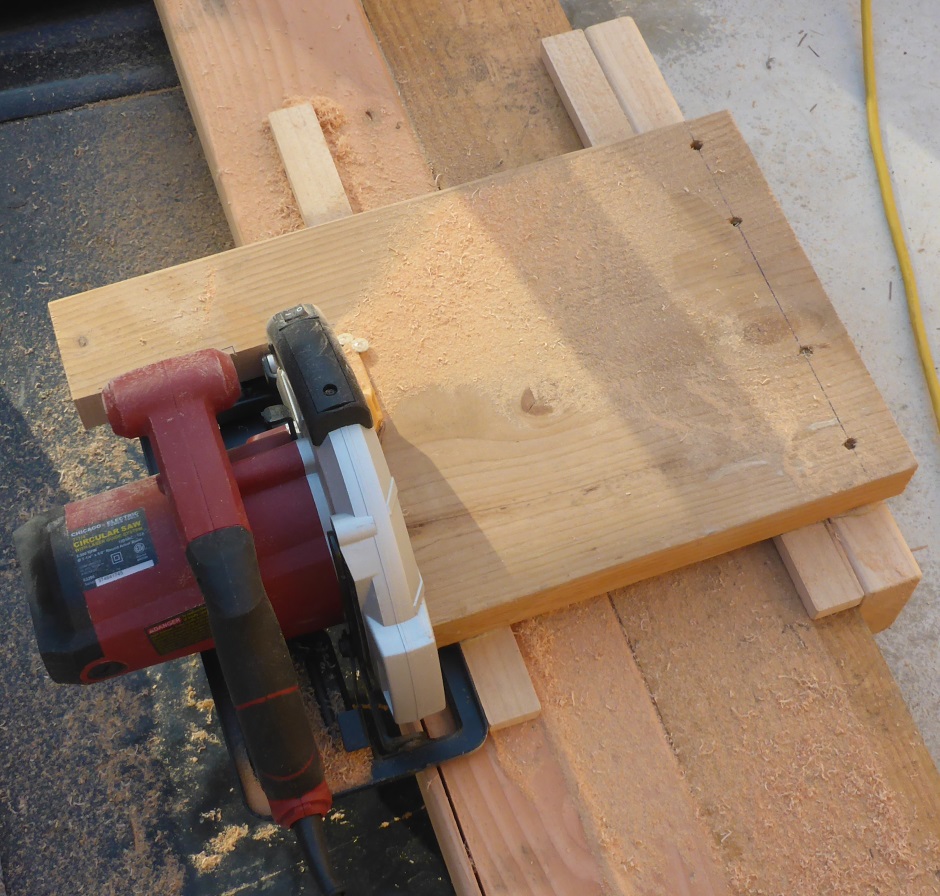
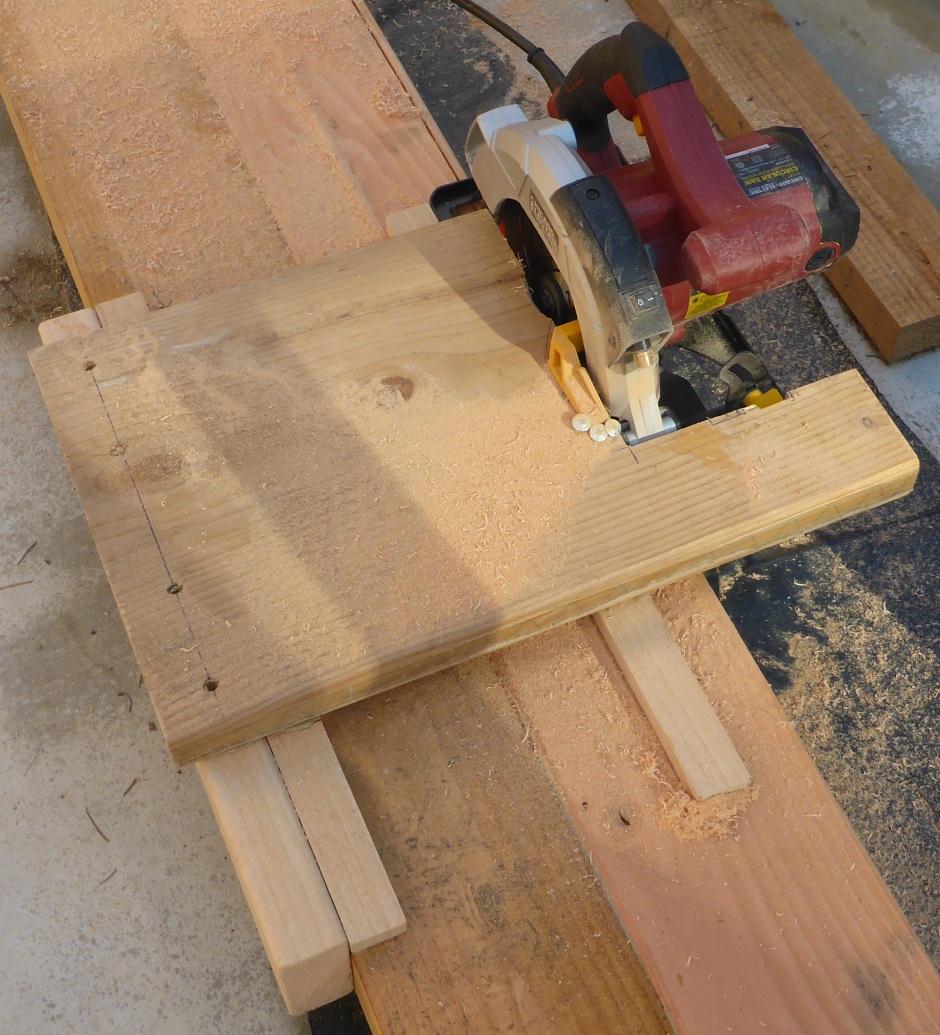
The overall height of the formed tall beam will be something like 11". The glued beam is then cut with a skillsaw in a custom jig to be exactly 10.5" (cutting the paired purchased 2x6s).
(Alternatively the beams can consist of a 3" wide piece of 2-by on top and a 9-1/2" TJI-110 I-beam below but this will need to be covered with eg drywall as it is not pretty. Another alternative is to use two 2x12 lengths of lumber glued together.)
If using purchased 2-by lumber then it will likely be necessary to join lengths of lumber to get the required span length. That is the reason that the slot in the Carnation Flooring profile EPS is 3" wide (2 x 1.5"). Joined pieces are offset either side of the available 3".
When gluing I form a very slight upwards bow using shims. Having a slight bow is better for taking the wet concrete force and is more visually appealing. The center shim is 3/4" relative to the ends on a 20 foot beam.
Here is the process for making the home-made glu-lam beams that I use...
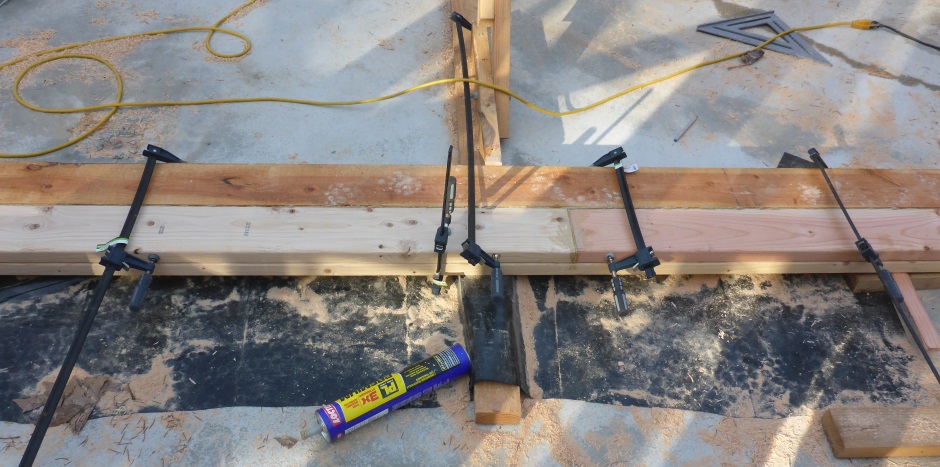
Here is the skillsaw custom jig used to cut the beams to be 10.5" tall...
As the 10.5" beams stay in place for ever and are typically visible, I paint them with clear wood protection . Apply with plenty of ventilation to get rid of the VOCs, but it does not contain particularly bad ingredients so it is ok to use internally once it is dry.
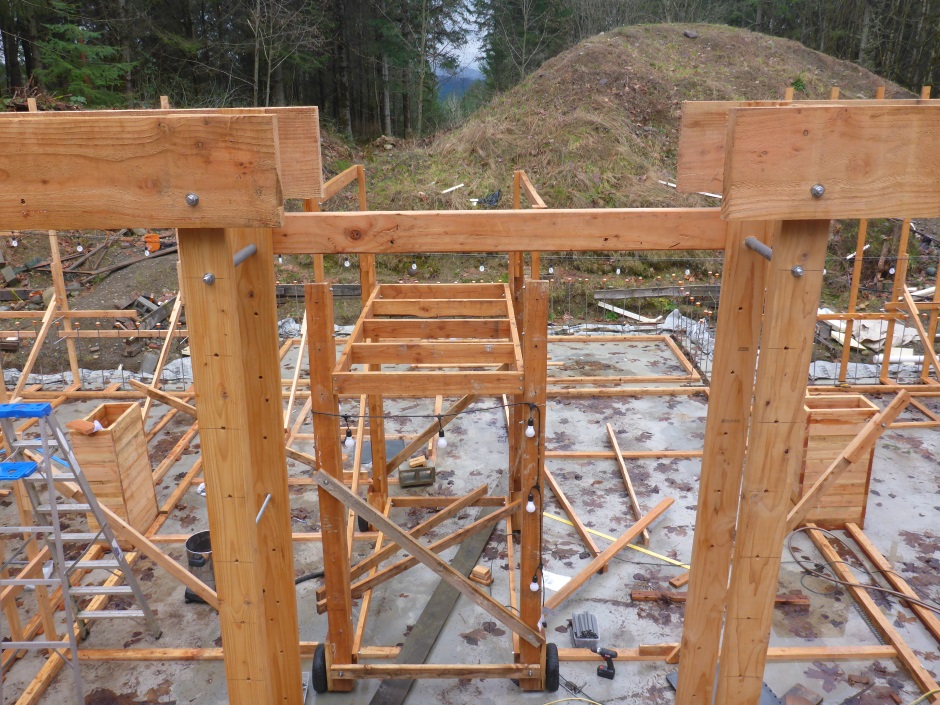
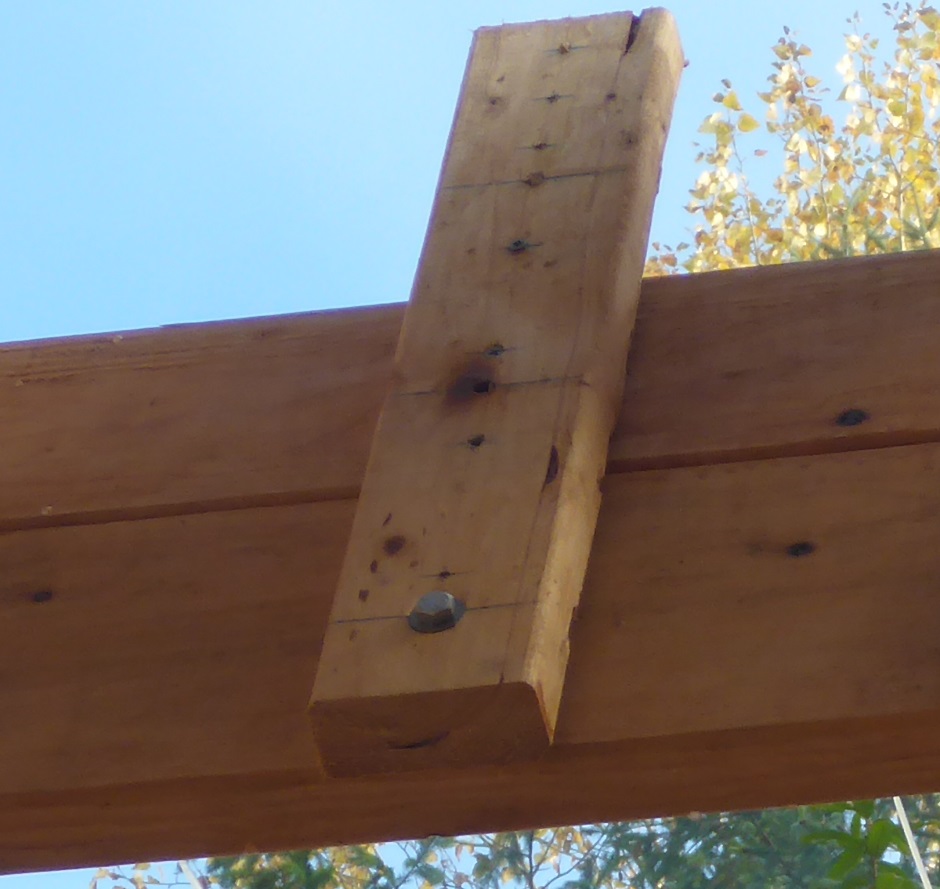
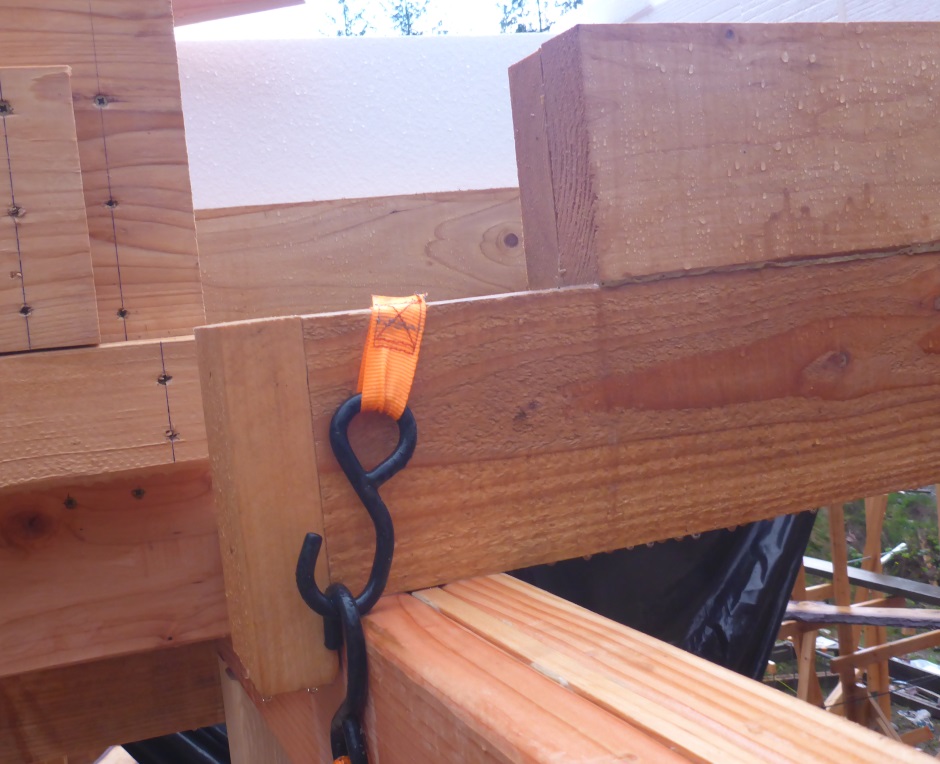
Fix locator blocks to the ends of the beams ready for hooking over the support lumber that is at the top of the walls. These blocks are 1.5" x 1.5" x 3" long with two holes for 3" screws.
Cut the beams so they do not go over the floor openings. Special stepped ends are needed to form the concrete lip.
For my basement here are the lengths and quantities...
22' 1-1/4"
13
17' 11-5/8" 4
17' 2-1/2" 9
16" 10-1/2" 21
15' 5-5/8"
1
10' 3-3/4"
3
Where there is an opening in the concrete (eg for stairs or elevator shaft) you need to form a 6" concrete lip round the hole. To help with this, the wood beams are a bit different on the end. The glued on 2x6s are deliberately shorter than the sawmill cut beams to allow for the concrete lip.
Install 10.5" floor beams
The beams go East-West. They extend all the way to the plywood (face of the 1/2 construction plywood closest to the inside of the building). They over-lap the vertical 2x4 batons (and the 2x8 horizontal batons with the 2x6s on top) and are supported by them. Their length comes from the house CAD drawing. The position of the beams is indicated by the marks on the top edge of the 2x6s at the top of the concrete walls.
Use ratchet straps to securely fix the beams.
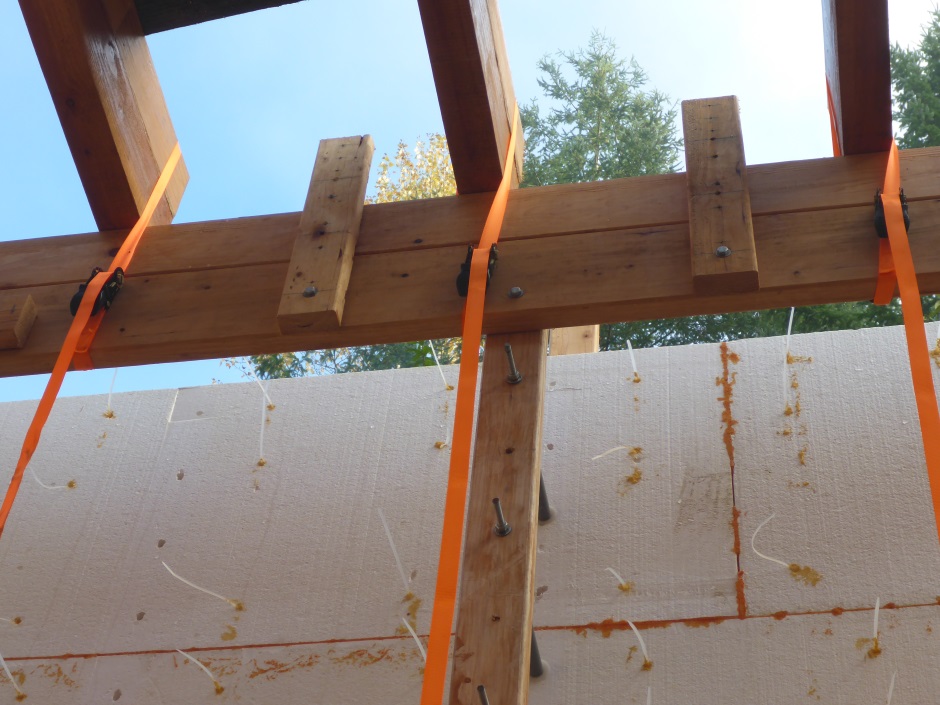
You do not want the beams over the floor cutout areas. Use special beams that form a concrete lip round the floor opening.
The various internal wood divider walls help support the main ceiling beams.
Final steps
Check the building is square and the walls are vertical by observing the plumb bobs in each of the corners.